
|
| ACRES: Development | |||
| Code | Account / Section / Description | jump to start developer notes | |
| Notes | Key | Description |
| {table_name} | reference specific database table name/field | |
| <function> | ACRES specific function/task | |
| [Menu] | changes to the menu structure | |
| 'quote' | set name or value | |
| All database and table structure definations are below the GUI specifications. | ||
| Fonts | Chat session and trouble ticket system font ideas | |
| Trebuchet MS - very clean evenly spaced font. | ||
| General | Notes for specification designer, not developer. | ||
| ACRES - USERS: Menu level access to be tested on full ACRES implementation. Base Data |
|||
| Access per account_id | |||
| Operations Setup | |||
| Only if defined/permitted by account | |||
| Need to specify Managed Accounts from date and to date | |||
| Need to specify PMM Module access from date and to date | |||
| tab ideas https://jqueryui.com/tabs/ | |||
| tba | Documentation > Booking Advice | tba1 |
| Product Level Notes Client Rate Codes Client Request Codes Header Text / Associated Bookings |
||
| tba | take no action until code references created - future ACRES dev | tba2 |
| calendar: edit calendar days in make sale. Allow change dates, times and provisional flag only. If another property required then delete product and add new must be done. | ||
| calendar: edit calendars - allow edit provisional flag and times and dates for calendar updates only to be performed if the calendar update function was performed originally. If the calendar was updated from a 'make sale' transaction then the edit/delete functions should be disabled in 'calendar updates'. | ||
| client requests | ||
| User Groups/Users Accounts: Concurrent connection settings by User Group and by User to limit the number of concurrent connections an ACCOUNT is permitted and also the number of concurrent connections a USER is permitted (default=1). | ||
| tba 3 | Contracts > spec notes | tba3 |
| contracts | for pricing periods with set start date and set end date also need bookable date range to be able to preload special offers and future season rates. For pricing either side of a specific date such as Easter Sunday, define option for 'specific date' and set numbers of days prior and after that rate applies. e.g. 10 days either side of 'specific date'. Inherit season date option between buying contracts and selling contracts. |
|
| PMM1 | Notes for specification designer, not developer. | pmm1 | ||
| note1 | PM Sale for PMC. Use same table for Owners. Flag record sale type as PMC or Owner. Beware PM Lock Date |
|||
| Owners to be able to input own bkg in their account through PMM with optional extra restrictions. Will need: |
||||
| Owner Booking: | ||||
| Owner collecting revenue. Owner declaring taxes. Includes Owner staying and Guest of Owner | ||||
| Owner collecting revenue. PMC declaring taxes. (charge for service?). | ||||
| PMC collecting revenue. PMC declaring taxes. (charge for service, processing fees, commission?). | ||||
| ACRES to create Sale for PMC with HO inputting {contact} details as no search on existing permitted as HO has no right to data. ACRES to create PM Sale. |
||||
| Documentation distribution to be determined. | ||||
Connect table require to connect PM Sale to Sale. Will need option to input PM Sale then connect in Make Sale |
||||
| Make Sale/PM Sale: Party Details: Need Country/Adt/Chd for security deposit and fire regulations. Country will enable PMC to have staff available with relevant language skills and could also be used for welcome letter on guest arrival. |
||||
| Documentation: Booking Advice | ||||
| create style type table | ||||
| link to {sale_transaction__type} | ||||
| set style type by {sale_transaction__type} | ||||
| eg Sale = style 1, Sale w/codes = style 3, PM Sale = style 3, PM Sale w/codes = style 4 | ||||
| Style type can then be added to {contact} so when a sale is made the style type is already highlighted for selection but can be changed if required. | ||||
| PMM 2 | Notes to spec writer not developer. | pmm2 |
| Recurring bills such as utility bills, use account number as reference point so this can also be used to prepopulate expense field text. Link EL loading in ACRES to PMM. |
||
| For sales and tdt declarations, PMC MUST declare if taxes been calculated on check-in date, checkout date, money received date. PMM to keep track of tax declared date for reporting. | ||
| For PMM revenue calculations, PMC MUST declare whether to show revenue on rentals as check-in date, checkout date or balance received date. PMM to store revenue declared date for reporting. | ||
| Contacts - Property Info: Inherit Gate Code from ......... | ||
| Use grouping/sort order for sub total calculations on HoS. | ||
| HoS Reporting will only be available between the Property Management Start and End Dates. Records need to be locked such as at end of year so figures cannot be changed. An entry will need to be made in the current reporting period if an adjustment is needed. See PM Lock Date. Only one PM Locked Date needs to be stored. Any action affecting records less than or equal to the PM Locked Date IS NOT permitted. |
||
| Reporting: Where a Utility Bill is flagged as monthly reporting but no corresponding entry found in Expnse Ledger for Month/Year then ACRES to display 'no entry this period' on HoS. |
||
| use key at bottom of HoS as
this gives more space for descriptions. CF to show PM ref, name, dates |
||
| HoS connector table to keep track of monthly services to be charge to HoS. End Date can be blank so continues until further notice. Applied date can be set or NULL. If NULL use 1st of the month. |
||
| HoS will only show records on HoS between HoS Start/End Dates. If Services, Service Bundles have dates outside the HoS date range they will not be reflected on the HoS. |
||
| For speed, may store HoS balance at PM Lck Date in {pm_managed}. Could use as reference for next period calculation and historic review. | ||
| on completion of PM Sale spec set Set {account_sale_number} = {sale_id} in {sale} for ALL records Create record in {account_connector} for {account_id} = 1 and set {account_sale_number} highest current {sale_id} |
||
| System then to be reconfigured to show {account_sale_number} from {sale} which will unique to {account_id} whilst {sale_id} will be unique to ACRES. | ||
| Use INHERIT concept for cross platform ACRES users to avoid duplicating data such as property data, access codes, wi-fi codes. | ||
| PMM Cleaning rosta with property, check-in, checkout, proposed start, proposed end, contact_id where contact id is entity designated to carryout the clean. Contracted cleaners should be able to sign in and prepare their own cleaning information reports. |
||
| Use Property Management menu option to select {contact_id} to use on HoS. | ||
| HoS forecast view based on average historical data and known advance reservations. | ||
| use message board to warn user that {pm_lock_date} not set with 'n' days where current date > {pm_lock_date} plus 'n'. | ||
| 22Feb2016 | create PM Home Inventory tables to store data on: Pool Equipment (also when servicedsuch as heat exchanger and filters) Electronic (TV's) and model/serial numbers to help with insurance A/C unit model/serial, major servicing etc |
|
| captcha: form filling anti spam | ||||
| 25Mar2016 | 16:39 | vm>rh | I guess you meant: Captcha: https://en.wikipedia.org/wiki/CAPTCHA | |
| 24Mar2016 | 14:13 | rh>vm | Don't worry, found it (Anti-spam forms) | |
| 14:00 | rh>vm | What is the correct terminology for form submit when users have to input a code displayed to validate the form submit process? | ||
| link for installing noCaptcha reCaptcha | link | |||
| see Suppliers/G/Google for Google Account Settings | ||||
| General Email Correspondence not modular specific | ||||
| 09Dec2016 | 06:33 | rh>vm | Also we should talk as I need to understand how/why you code so I don’t do specs then query why you haven’t done the way I have requested. Maybe I need to change the way I produce specs. |
|
| spec | 161017-04: ACRES Availability GUI | 161017-04 | |
| When the ACRES Availability GUI first displays only default value will display. Initially this will just be the Flex Days value '7'. As fields are completd ACRES logic will complete other fields as specified in 161017-03. |
|||
| Check-In Date: 2/15/2017 |
|||
| ACRES Availability will display property availability calendars in {system_code} order and in sections. The first section will be all properties defined for the ACRES USER in [Property Management] > [Managed Properties] taking into account the {pm_managed.to_date} so properties no longer under management are not displayed. Any subsequent sections will only display availabilty for properties defined in 161017-01, again in {system_code} order. Breaking out sub divisions can be introduced in a later release. The search criteria and the ACRES Calendar Key will display and be fixed so as you scroll left / right /up / down these will always remain at the head of the GUI. The calendar for each property will display in a linear format so all dates on one line per property. The date of the month will continue to display in the color coded availability as with current ACRES calendar displays. The day of the week, month and year will display as vertical text at the top of each section. After an initial search, the text in the search icon will change to 'refresh' to enable an ACRES user to double check availability after searching for some period of time. The refresh will enable any updates from other users to be reflected in the result set. The ACRES Availability GUI should refresh and remain in the same position for the ACRES user without them having to re-scroll to the position from where they selected refresh. When 'refresh' is selecting the text could change to 'refreshing' so the user knows the action is being performed. Once the refresh is complete the text should go back to display 'refresh'. If any of the search criteria are changed the text will display 'search'. |
|||
| Example ACRES Availability GUI | |||
| Fixed display |
Check-In Date: 2/15/2017 |
||
| Fixed display |
|||
| First section display for Managed Properties. The first displayed date will be 2/15/2017 and as there are flex days set a left scroll option will be presented to allow the ACRES user to view the prior week as the flex days wasset to '7'. The display will continue to 3/8/2017 and display the availability. The limitation to display will be the width of the broswer so a right scroll will display if the date range goes further than the browser displays. |
|||
| <<<<< System Code ORLGR3H007 ORLGR4H087 |
 |
>>>>> if more dates then right scroll option will display |
|
| The next section will now display any properties defined in 161017-01 | |||
| <<<<< System Code ORLGR4H012 ORLGR4H019 |
|
>>>>> if more dates then right scroll option will display |
|
| spec | 161017-03: <function> Sales > ACRES Availability | 161017-03 | ||
| The purpose of ACRES Availability is to display property availability for all properties under management and any additional properties where {property_account_connector.acres_availability} = TRUE. Selecting Sales > ACRES Availability will display the ACRES Availability GUI: |
||||
| Check-In Date | ||||
| the standard ACRES date format logic where if year is missed then current year assumed | ||||
| offer 'click to open date selector' but should revise this to a calendar icon | ||||
| Checkout Date | ||||
| the standard ACRES date format logic where if year is missed then current year assumed | ||||
| offer 'click to open date selector' but should revise this to a calendar icon | ||||
| Nights (Nts) | ||||
| INTEGER value minimum 1 digit maximum 3 digits in range 1-999 | ||||
| Flex | ||||
| INTEGER value 1 digit range 0-9 | ||||
| this value is the number of nights before Check-In Date and after Checkout Date to display availability | ||||
| default value = '7' which eventually will be set as part of ACRES USER set up in [Base Data] | ||||
| when Check-In Date and Checkout Date are not NULL then Nights can be automatically populated by ACRES | ||||
| when Check-In Date and Nights are not NULL then Checkout Date can be automatically populated by ACRES | ||||
| when Checkout Date and Nights are not NULL then Check-In Date can be automatically populated by ACRES | ||||
| See 161017-04 for ACRES Avalability GUI | ||||
| spec | 161017-02: [ACRES Availability] | 161017-02 | |
| Create a new menu item [ACRES Availability] | |||
| locate [ACRES Availability] in [Sales] above [Calendar Updater] | |||
| 09Dec2016 | Limit display to account 'uscali0000' until Base Data can be used to control where menu items appear. | ||
| 161017-02 | ||||
| 09Dec2016 | 06:33 | rh>vm | The ‘Managed Availability’ is appearing on the homeowner logins which is confusing them, It should only appear in my account for the time being. Label should read 'ACRES Availability' as per specification. |
|
| 12:52 | rh>vm | I am the only one using the system as it is not completed so we don’t need to worry what anyone else may do as were far from marketing the product. ACRES Availability fits the bill perfectly. Once other travel types like car hire are added it will still be accessed here just with another step asking users what type of availability they want. Please use the name as specified and associated text labels. |
||
| 06Dec2016 | 04:37 | vm>rh | I named the field “Managed Availability”, because “Acres Availability” is not general - functionality could be used by different companies. | |
| 05Dec2016 | 14:41 | rh>vm | 161017-02 is not the correct label. See spec. The availability is not limited to managed homes. Please show correct label text. | |
| 18:17 | vm>rh | No, I was talking about 00, 01 | ||
| 26Oct2016 | 11:31 | rh>vm | I still can’t see the menu change and functions for 161017-02 161017-03 161017-04 which you said were done. These aren’t affected by the corrections you’re doing for 161017-00 161017-01 so is there any other reason why I can’t see them? | |
| 24Oct2016 | 10:16 | rh>vm | 161017-02 menu items doesn’t show in ACRES for me so I can’t check the availability displays | |
| 18Oct2016 | 13:19 | rh>vm | 161017-02 161017-03 and 161017-04 have been added. There is no new data spec it’s just the display for exisiting data to make the sale process easier. Work order: 161017-00 161017-01 161017-02 161017-03 161017-04 Can you get to them this week? |
|
| spec | 161017:01: <function> Contacts > Property Info> ACRES Availability | 161017-01 | |||||
| The ACRES GUI for [Contacts] Property Info needs to display the new [property_account_connector.acres_availabilty} field to allow the set. | |||||||
 |
|||||||
| For each Property (system code) displayed within the Proprty Info section of the contact a new label and checkbox field will enable the ACRES user to set whether the availability for a specific property (NOT SET IN PROPERTY MANAGEMENT) will be displayed in an availability search. | |||||||
|
|||||||
| Display in ACRES availability: |
|||||||
| Contacts > Property Info | |||||||
| Create a label that will display next to each property listed in the Property Info section of a Contact. | |||||||
| Display in ACRES availability: | |||||||
| Display the checkbox field linked to 161017-00 {property_account_connector.acres_availability} | |||||||
| Check box to display the value of the field. Default on creation was false. | |||||||
| There is no SAVE function required as no data is being changed. The field merely determines the user preference whether to display availability or not. | |||||||
| 161017-01 | ||||
| 24Oct2016 | 10:16 | vm>rh | 161017-01 wording should read ‘Display in ACRES availability:’ Layout is strange so display the label to the right of the checkbox |
|
| spec | 161017-00: {property_account_connector} acres_availability | 161017-00 | ||
| To enable the search for availability for properties featured in ACRES that are not under the ACRES USER property management a flag is required to trigger this action. As there is already a connector table {property_account_connector} that is linking a {property_id} with an {account_id} the same table can be used to hold the new 'acres_search' field. A user account will need to establish the relationship by creating the contact the property is being purchased from and the property if the property doesn't already exisit in ACRES. See Property Info in [Contacts]. |
||||
| create new field {property_account_connector} | ||||
| acres_availability | ||||
| value option true / false | ||||
| default value is FALSE |
||||
| 161017-00 | ||||
| 09Dec2016 | 06:33 | rh>vm | The ‘Managed Availability’ is appearing on the homeowner logins which is confusing them, It should only appear in my account for the time being. Label should read 'ACRES Availability' as per specification. |
|
| 19:47 | vm>rh | I'll make change to the name. Although I mean different companies will do the same | ||
| 08Dec2016 | 12:57 | rh>vm | Any response to below? | |
| 12:52 | rh>vm | I am the only one using the system as it is not completed so we don’t need to worry what anyone else may do as were far from marketing the product. ACRES Availability fits the bill perfectly. Once other travel types like car hire are added it will still be accessed here just with another step asking users what type of availability they want. Please use the name as specified and associated text labels. |
||
| 12:52 | rh>vm | Why have you used your two tables and not the table specified? | ||
| 06Dec2016 | 04:37 | vm>rh | New field external_mgmt has been added to two tables: property_mgmt_contact, property_owner_contact | |
| 05Dec2016 | 16:37 | rh>vm | I still can’t see you’ve finished 161017-00 This is a must as it drives the other specs. Where have you put it? |
|
| 08:51 | rh>vm | No it isn’t. If the property changes owner the calendar will display in ACRES still and that is not correct. The calendar display is based on the Property/Contact relationship not just the property. | ||
| 25Oct2016 | 08:47 | vm>rh | Yes, I understand, but that is better place to make program more simple. I’ll call you. | |
| 10:48 | rh>vm | It's because the relationship is between the owner and the property not just the property. | ||
| 24Oct2016 | 10:27 | rh>vm | You have created a field {external_mgmt} in {property} This is not correct. The specification was clear: (refer to specs) External Management is not the correct spec for this feature. Please rectify according to the specification. |
|
| 22Oct2016 | 18:33 | vm>rh | Richard, I implemented 161017-00 - 161017-04 - please take a look | |
| 21Oct2016 | 08:05 | rh>vm | Let me know as soon as 161017-00 and 161017-01 done as they should be quick and I can start updating my contacts whilst you work on the display side for the other specs. | |
| 20:05 | vm>rh | working | ||
| 20Oct2016 | 10:35 | rh>vm | Any progress? | |
| 17Oct2016 | 14:01 | rh>vm | I haven’t heard from you for months so assume none of the other work has been completed yet. 161017-00 and 161017-01 have been added to dev. They need to be done in order to make sense. There will be a few items to add for the linear display of availability which we spoke of a few years ago that is now required and this will form the basis of live availability searches on the web. I’m working on these next. Apart from one added field there is no new coding so these can be added pretty quickly I’m sure. |
|
| spec | 160215-00: <function> Sales > Sale > Sale Type / Sale Purchase Type relationship | 160215-00 | |||
| Functionality to enable a | |||||
| Sale Ext / Sale Purchase Int | |||||
| from an exisiting | |||||
| Sale Int / Sale Purchase Int | |||||
This will cover a scenario where there is an internal Property Management division that also has a division making external Sales. Sale Int / Sale Purchase Int |
|||||
| Enable reporting of Sales Tax and Tourist Development Tax Enable Homeowners to create their own reservations (Calendar Updater to be disabled for PM Homeowners) |
|||||
A SID with Sale Ext / Sale Purchase Int MUST exist before a SID with Sale Ext / Sale Purchase Int |
|||||
| The relationship must work this way round to avoid conflict and/or duplaications in {calendar} and {sale_transaction} | |||||
SID with Sale Int / Purchase Int |
|||||
| STEP A | |||||
| Contact search: limited by {contact_division} | |||||
| only {contact_id} flagged as division_contact_id will be available for selection | |||||
| At this point, ACRES does not know who the main {contact_id} is so this should become part of the Base Data setup process. This would then drive the {contact_id} available in the Sale Int / Sale Purchase Int STEP D. | |||||
| Sale Int is selected so ACRES logic sets Sale Purchase Type to Purchase Int automatically | |||||
| Will need to clarify if / when this can be amended. ACRES logic could check if the SID exists as a PARENT_SID and not allow the change. If it does not then the fields can be changed subject to other logic such as HOS Date. |
|||||
| STEP D | |||||
| Purchase Supplier, for Sale Int / Purchase Int only, should be limited to ONLY primary_contact_id in the relationship defined by the {contact_id} selected in STEP A. This in effect means that only one {contact_id} should be available. |
|||||
| The Sale Product Amount and Taxes MUST be completed as these will drive the purchase value fileds in any related sale. | |||||
| The Purchase Product Amount fields will default to an exact match of each Sale Product Amount field completed as the Purchase Product values will be reflected on the Homeowner Statement. | |||||
| STEP E | |||||
| Sale Level Optional Extras should be calculated the same way as Sale Product and Purchase Product as any Sale Level Optional Extra sale rate will become the Sale Level Optional Extra purchase rate in any external sale. | |||||
| Product Level Optional Extras should be calculated the same way as Sale Product and Purchase Product as any Product Level Optional Extra sale rate will become the Product Level Optional Extra purchase rate in any external sale. | |||||
| STEP F | |||||
| Print documentation requirements will be provided as the section notes that exist can be utilised along with the booking advice in a simple format. | |||||
| Due Date may need some tweaking as this does not work in the same way asan external sale. When Homeowners start putting their own reservations into ACRES they may need to set the date rather than it being calculated. | |||||
| For any Sale Ext / Purchase Int, the Purchase value side of a reservation, along with the property and calendar section, will be disabled so the user will only be able to control the selling prices, add additonal products and extras and totally control those. If the Sale rates are amended in a Sale Int / Purchase Int SID and there is a relationship with a Sale Ext / Purchase Int SID then any Sale rate amendment should AUTOMATICALLY be refected in the Purchase rate of the Sale Ext / Purchase Int SID. |
|||||
| SID with Sale Ext / Purchase Int | |||||
| Use [menu] Sales > Sale to locate the SID for the Sale Int / Purchase Int booking | |||||
| Any SID with Sale Int / Purchase Int that has no exist relationship with another SID will display the ACRES house icon as per the PM EL column in the Expense Ledger GUI. | |||||
| Any SID with Sale Int / Purchase Int that has an existing relationship with another SID will display the ACRES house and folder icon as per the PM EL column in the Expense Ledger GUI. | |||||
| When there is no existing relationship and the house icon is selected a new SID will be created and relationship established after at least the completion of STEP A. | |||||
| STEP C | |||||
| Customer fileds will be disabled as the information will be inherited from the parent SID | |||||
| STEP D | |||||
| Product delete option will be disbaled for any product inherited from parent SID. |
|||||
| Purchase Supplier will automatically be populated and non changeable for any product inherited from parent SID as calculated by the {contact_id} relationship. | |||||
| Purchase Ref will automatically be populated and non changeable. It will be inherited from the 'Manual Ref' field from STEP A of the parent SID. | |||||
| Purchase amount and Purchase Taxes will be inherited from the parent SID and non changeable. | |||||
| STEP E | |||||
| Sale Level Optional Extras to be calculated in the same manner as STEP D. | |||||
| Product Level Optional Extras to be calculated in the same manner as STEP D. | |||||
| Establishing {contact_id} relationship: | |||||
| This feature is only to be enabled for a {contact_id} flagged with {contact_type} = Property Manager. This feature will determin which {contact_id} are available for selection in divisional sales by the defined relationships. |
|||||
| A table will need to be created to cater for divisional relationships between {contact_id} | |||||
| The primary_contact_id [contact_id} field would represent the parent Company The second {contact_id} division_contact_id would represent a division with the primary_contact_id |
|||||
| ACRES logic would need to check on add/edit that any {contact_id} could not be used asa primary_contact_id and a secondary_contact_id | |||||
| Company A is a primary_contact_id Company B is a division_contact_id of Company A Company C could be a division_contact.id of Company A or Company B Company A CANNOT then be a division.contact_id of Company B or Company C |
|||||
| Any primary_contact_id and division_contact_id must exist before the relationship can be created. | |||||
| [menu] Operations > Contacts | |||||
| A {contact_division} table may need to be created to cater for this function as there may be a requirement for the relationship: 1 to MANY Create a new section in the Contacts GUI above Property Info called |
|||||
| Divison Contact | |||||
| Division contact section will only be available when a {contact_id} exists that will be set as the primary_contact_id in the contact connector table | |||||
| Right of the 'Divison Contact:' label show a character sensitive input field for users to type in the name of the {contact_id} being used as a division_contact_id. As the field is completed the list of matching {contact_id} will be displayed for selection. (Above is the preferred selection method but for speed the contact_id selection method in Sale STEP A could be used) |
|||||
| {contact_id} selection to be limited only display contact_type = Agent or Tour Operator. {contact_id} already selected as division_contact_id for the current primary_contact_id will not be available for selection as the relationship will already exist. |
|||||
| Right of the {contact_id} selection field show the ACRES plus sign | |||||
| When the plus sign is selected ACRES logic will validate the selection and display the division_contact_id in line and under the 'Division contact:' label. | |||||
| The ACRES delete icon will display to the right of any division_contact_id | |||||
| Selecting the ACRES delete icon will not delete the relationship in the connector table. It will set the deleted field value to true so any deleted values will not display in ACRES. If the relationship is recreated then ACRES logic will see if a matching relationship already exists and set the deleted value to false so the relationship will start displaying in ACRES again. |
|||||
| spec | 160108-01 <function> Sales > Sale > Sale Product Exempt Amount | 160108-01 | |||||
| To be completed after implementation of 160108-00. This will store any Purchase Internal Exempt value where taxes do not apply to enable Property Management sales reporting and monthly tax returns. This field will only be enabled on the Sale GUI when Step A: |
|||||||
| Sale Purchase Type = Purchase Int {sale_type_id.4} | |||||||
| The display may change as the previous gui changes for STEP D have not been implemented as at 08Jan2016. create new label |
|||||||
| Purchase Exempt Amt | |||||||
| place Purchase Exempt Amt to the right of Purchase Amt | |||||||
| create a field for {sale_purchase_exempt_amount} and locate it to the right of the purchase amout field and below the new Purchase Exempt Amt label. | |||||||
| {sale_purchase_exempt_amount} will always be disabled when the Sale Purchase Type IS NOT Purchase Int. IF Sale Purchase Type = Purchase Int {sale_type_id.4} |
|||||||
| THEN {sale_purchase_exempt_amount} = enabled | |||||||
| ELSE {sale_purchase_exempt_amount} = disabled | |||||||
| When {sale_purchase_exempt_amount} is NOT NULL then tax calculations will be affected. Taxes will need to be calculated by deducting {sale_purchase_exempt_amount} from {sale_purchase_amount}. Example: with Sales Product Amount = 500 and Sale Product Exempt Amount = 50 then taxes to be calulated based on the value 500-50=450 |
|||||||
| Purchase Amt | Purchase Exempt Amt | ||||||
| 500.00 | 50.00 | ||||||
| Sales Tax | 7% | 31.50 | |||||
| Tourist Development Tax | 4% | 18.00 | |||||
| spec | 160108-00 {table} sale_product > sale_product_exempt_amount | 160108-00 | |||||
| Add new field to {sale_product} which will only be utilised when {sale_type_id} = 4. That is {sale_type_name} = Purchase Int. This will store any Purchase Internal Exempt value where taxes do not apply. |
|||||||
| create new field | |||||||
| sale_product_exempt_amount | |||||||
| insert sale_product_exempt_amount after sale_product_amount | |||||||
| default value is NULL numerical value set to two decimal places cannot be negative |
|||||||
| 150722-06 | {table} sale - updates | ||||
| Two new fields will be added to {sale} to reflect the following: | |||||
| Sale type | entity a sale is being sold to | ||||
| Sale Purchase type | entiiy a sale is being purchased from | ||||
| sale_sale_type_id | |||||
| sale_type_id | restricted to sale_type_id 1 or 3 | ||||
| sale_sale_purchase_type_id | |||||
| sale_type_id | restricted to sale_type_id 2 or 4 | gui disabled until sale_sale_type_id selected | |||
| if sale_sale_type_id = 3 | |||||
| then sale_sale_purchase_type_id restricted to sale_type_id 4 | gui input field will be disabled | ||||
| Table {sale} needs to be updated once 150722-07 has been completed. This is the gui update for inputting a sale on STEP A ti include the 2 new fields. | |||||
| sale_sale_type_id | update ALL sale_sale_type_id with sale_type_id = 1 | ||||
| sale_sale_purchase_type_id | update ALL sale_sale_purchase_type_id with sale_type_id = 2 | ||||
| Exisitng reports need to be updated reflected the two new fields in {sale_id} or the reports can be edited to allow user to select types to report on. | |||||
| All Sales related reports will be linked to {sale.sale_type_id} = 1 | |||||
| All Sales Purchase related reports will be linked to {sale.sale_purchase_type_id} = 2 | |||||
| All Margin related reports will be linked to the combination | |||||
| {sale.sale_type_id} = 1 AND {sale.sale_purchase_type_id} = 2 | |||||
| 150722-07 | <function> Sales > Sale | ||||
| This change is to enable users to identify the type of sale and sale purchase on a booking to allow more in depth reporting and enable Property Management sales reporting and monthly tax returns. The two new fields are being placed into STEP A as the {sale_id} is created at this step. |
|||||
| Sales > Sale: STEP A Select Company/Contact | |||||
| move 'click on open date selector' to under Sale Date input box OR display a calendar icon |
|||||
| insert a field label to the right of Client Ref. | |||||
| Sale Type | |||||
| insert an input box under 'Sale Type' | |||||
| The Sale Type input box will be a drop down showing {sale_type_name} for {sale_type_id} 1 and 3 | |||||
| insert a field label to the right of Sale Type | |||||
| Sale Purchase Type | |||||
| insert an input box under 'Sale Purchase Type' | |||||
| The Sale Purchase Type input box will be a drop down showing {sale_type_name} for {sale_type_id} 2 and 4 | |||||
| The Sale Purchase Type input box will be disabled until a Sale Type has been selected | |||||
| if sale_sale_type_id = 3 | |||||
| then sale_sale_purchase_type_id restricted to sale_type_id 4 gui input field will be disabled and display {sale_type_id.sale_type_name} |
|||||
| ACRES will prevent users from moving to Sale STEP B until Sale Type and Sale Purchase Type have been selected. In sale edit mode ACRES logic will need to validate {sale_type_id}. PM Sale will need to validate also against PM Lock Date but this will be covered in the specifications for PM Sale separately. |
|||||
| 150107-00 16Feb2015 |
<function> Sales > Sale - booking type | |||||
| Not to be confused with Sale Type. ACRES current function has check boxes for Provisional Booking and Period Booking in STEP D that can both be set to true. This should not be the case as a Provisional Booking may only exist in a Period Booking but not vice versa. There are going to be 3 booking types: |
||||||
| Booking | ||||||
| Booking is the default setting and the current ACRES booking type when Provisional Booking and Period Booking are NOT TRUE This does not need a new table field. If Provisional Booking and Period Booking are NOT TRUE then the booking type is Booking and the radio control is enabled |
||||||
| Booking cannot overlap existing Booking (current ACRES logic) | ||||||
| Booking cannot overlap exisiting Provisional Booking (current ACRES logic) | ||||||
| Booking can exist within a Period Booking date range for the same {contact_id} ONLY (current ACRES logic) | ||||||
| Booking can cross from one Period Booking to another Period Booking for the same {contact_id} ONLY under condition that: | ||||||
| Period Bookings have been linked (see Period Booking for specifications) | ||||||
| Provisional Booking | ||||||
| Provisional Booking cannot overlap existing Booking (current ACRES logic) | ||||||
| Provisional Booking cannot overlap exisiting Provisional Booking (current ACRES logic) | ||||||
| Provisional Booking can exist within a Period Booking date range for the same {contact_id} ONLY (current ACRES logic) | ||||||
| Provisional Booking can cross from one Period Booking to another Period Booking for the same {contact_id} ONLY under condition that: | ||||||
| 15 | Period Bookings have been linked (see Period Booking for specifications) | |||||
| Period Booking | ||||||
| Period Booking cannot overlap existing Period Booking | ||||||
| Period Bookings can be linked to allow Booking and Period Booking to run from one Period Booking to another Period Booking on condition that: | ||||||
| First Period Booking End Date = Second Period Booking Start Date | ||||||
| Changes to {sale_id} for linking Period Bookings | ||||||
| create two new fileds in {sale_id} | ||||||
| period_booking_sale_id_pre | ||||||
| period_booking_sale_id_post | ||||||
| no fields created as ACRES will calculate on the fly but only display if dates with nn months of current date | ||||||
| A {sale_id} must exist to be used as a Pre or Post Sale_ID | ||||||
| Pre SID and Post SID will be disabled from view until Period Booking selected | ||||||
| For a current {sale_id}, when a {sale_id} is inserted into {period_booking_sale_id_pre} then: | ||||||
| the current {sale_id} becomes the Post Sale_ID for the {sale_id} that was inserted and will display in the Post SID field when the {sale_id} inserted is viewed in ACRES. Example: 5678 is viewed in ACRES and set to Period Booking The Pre SID and Post SID fields are enabled 1234 is inserted into the Pre SID field 5678 will then become the {period_booking_sale_id_post} for 1234 When 1234 is viewed in ACRES, 5678 will display in the Post SID field |
||||||
| For a current {sale_id}, when a {sale_id} is inserted into {period_booking_sale_id_post} then: | ||||||
| the current {sale_id} becomes the Pre Sale_ID for the {sale_id} that was inserted and will display in the Pre SID field when the {sale_id} inserted is viewed in ACRES. Example: 5678 is viewed in ACRES and set to Period Booking The Pre SID and Post SID fields are enabled 9012 is inserted into the Post SID field 5678 will then become the {period_booking_sale_id_pre} for 9012 When 9012 is viewed in ACRES, 5678 will display in the Pre SID field |
||||||
Change to GUI |
||||||
| Booking | ||||||
| Insert Radio Control above current Provisional Booking Check Box Insert text 'Booking' above Provisional Booking |
||||||
| Provisional Booking | ||||||
| change Check Box to Radio Control | ||||||
| Period Booking | ||||||
| change Check Box to Radio Control | ||||||
| Insert text 'Pre SID' to the right of Provisional Booking | ||||||
| Insert an input field under 'Pre SID' on the same row as Period Booking | ||||||
| Insert text 'Post SID' to the right of Pre SID | ||||||
| Insert an input field under 'Post SID' on the same row as Period Booking | ||||||
 |
||||||
| 16Feb2015 | Tested bookings for SAME {contact_id} {property_id} combination | |||||
| booking start date prior to period booking start date / end date within period booking dates | ||||||
| result = failed | ||||||
| correct as booking does not fall with period booking dates | ||||||
| booking dates within period booking dates | ||||||
| result = completed | ||||||
| correct as booking dates fall within period booking date | ||||||
| booking start date within period booking dates / end date outside period booking dates | ||||||
| result = failed | ||||||
| correct as booking does not fall with period booking dates | ||||||
| booking start date within one period booking dates / end date within another period booking dates where period bookings are continuous | ||||||
| result = completed | ||||||
| correct as booking dates fall within continuous period booking dates | ||||||
| booking start date within one period booking dates / end date within another period booking dates where period bookings are NOT continuous | ||||||
| result = failed | ||||||
| correct as booking dates DO NOT fall within continuous period booking dates | ||||||
| Tested bookings for DIFFERENT {contact_id} but SAME {property_id} combination | ||||||
| booking start date within one period booking dates / end date within another period booking dates where period bookings are continuous BUT the {contact_id} is DIFFERENT | ||||||
| result = completed | ||||||
| incorrect as the {contact_id} is different in the period bookings ACRES should not have permitted the transaction to be complated. An error message should have been displayed. | ||||||
| Tested bookings for SAME {contact_id} but DIFFERENT {property_id} combination | ||||||
| booking start date within one period booking dates / end date within another period booking dates where period bookings are continuous, the {contact_id} is the same but the {property_id} is DIFFERENT | ||||||
| result = failed | ||||||
| correct as the {contact_id{ {property_id} is not unique | ||||||
| 140718-02 audit tab45 |
<function> Accounting > Audit > Expense Ledger Payments | |||
| The function is very similar to the [Sales Receipts] and [Sales Purchase Payments] with the double dates for tax date and receipt/payment dates. The existing [Expense Reports] can be used as a starting point. The existing report can be used with the payment date fields added so long as the current report will still work as it does now when no payment Start/End Dates are input. |
||||
| Expense Ledger Payments | ||||
| Report style label | ||||
| Radio control selection for 'by Date' 'by Category' 'by Creditor' | ||||
| Report mode label | ||||
| Summary Totals Only checkbox | ||||
| Report Start Date label | ||||
| Report Start Date input field with date selector | ||||
| Report End Date label | ||||
| Report End Date input field with date selector | ||||
| Expense Ledger Payment Start Date label | ||||
| Expense Ledger Payment Start Date input field with date selector | ||||
| Expense Ledger Payment End Date label | ||||
| Expense Ledger Payment End Date input field with date selector | ||||
| There could also be variations where the Report Start/End Dates are left blank so the report will show all Expense Ledger Payments within the defined period. Leaving the Expense Ledger Payment End Date blank with other fields completed would show all Expesne Ledger Payments equal to or greater than the Expense Ledger Payment Start Date. |
||||
The Report Start/End Date selection will be for the reporting period which is the {expense_ledger.tax_date]. |
||||
| Report Start Date | 01-Jan-2013 select records where {expense_ledger.tax_date} is greater than or equal to this date |
|||
| Report End Date | 31-Dec-2013 select records where {expense_ledger.tax_date} is less than or equal to this date |
|||
| Expense Ledger Payment Start Date | 01-Jan-2013 select records where {payment_ledger.payment_date} is greater than or equal to this date |
|||
| Expense Ledger Payment End Date | 31-Dec-2013 select records where {payment_ledger.payment_date} is less than or equal to this date |
|||
| Example where the reporting period is 01 Jan 2013 to 31 Dec 2013 and the payment period is 01 Jan 2014 to 31 Dec 2014. The report will show all Expense Ledger Payments in 2014 for Expense Ledger Entires with a 2013 {expense_ledger.tax_date}. These entires were therefore Expense Ledger Creditors at the end of 2013. | ||||
| Report Start Date | 01-Jan-2013 select records where {expense_ledger.tax_date} is greater than or equal to this date |
|||
| Report End Date | 31-Dec-2013 select records where {expense_ledger.tax_date} is less than or equal to this date |
|||
| Expense Ledger Payment Start Date | 01-Jan-2014 select records where {payment_ledger.payment_date} is greater than or equal to this date |
|||
| Expense Ledger Payment End Date | 31-Dec-2014 select records where {payment_ledger.payment_date} is less than or equal to this date |
|||
|
||||
| Example where the reporting period is 01 Jan 2013 to 31 Dec 2013 and the payment period is 01 Jan 2012 to 31 Dec 2012. The report will show all Expense Ledger Payments in 2012 for Expense Ledger Entires with a 2013 {expense_ledger.tax_date}. These entires were therefore Expense Ledger Pre-Payments at the end of 2013. | ||||
| Report Start Date | 01-Jan-2013 select records where {expense_ledger.tax_date} is greater than or equal to this date |
|||
| Report End Date | 31-Dec-2013 select records where {expense_ledger.tax_date} is less than or equal to this date |
|||
| Expense Ledger Payment Start Date | 01-Jan-2012 select records where {payment_ledger.payment_date} is greater than or equal to this date |
|||
| Expense Ledger Payment End Date | 31-Dec-2012 select records where {payment_ledger.payment_date} is less than or equal to this date |
|||
| All numeric fields too have summary totals. Re-display column heading above summary totals and report end totals. |
||||
| 'by Date' | ||||
| summary by calendar month | ||||
| 'by Category' | ||||
| summary by {expense_ledger.expense_category_id} | ||||
| 'by Creditor' | ||||
| summary by {expense_ledger.contact_id} | ||||
| Report column headings for: Expense Ledger Payments 'by Date' Report heading line 1: 'Report: Audit Expense Ledger Payments by Expense Ledger Tax Date' Report heading line 2: 'Report Tax Period: [report start date (dd mmm yyyy)] - [report end date (dd mmm yyyy)] Report heading line 3: 'Expense Ledger Payment Period: [expense ledger payment start date (dd mmm yyyy)] - [expense ledger payment end date (dd mmm yyyy)] |
||||
| Sort Order | ||||
| {expense_ledger_id.tax_date} {expense_ledger_id} {payment_ledger.payment_date} {payment_ledger.payment_ref} |
||||
| Column Display | ||||
| expense_ledger_id.tax date | ||||
| label: tax date format: ddmmmyyyy (no gaps between day month and year) |
||||
| expense_ledger_id | ||||
| label: ID | ||||
| expense_ledger.manual_ref | ||||
| label: Man Ref | ||||
| expense_ledger.contact_id | ||||
| label: Supplier | ||||
| expense_ledger.total_amount | ||||
| label: Total | ||||
| expense_ledger.expense_category_id | ||||
| label: Category Display category name from {expense_category} not the id number |
||||
| expense_ledger.due_date | ||||
| label: Due Date | ||||
| payment_ledger.payment_date | ||||
| label: Date Paid | ||||
| payment_ledger.bank_account_id | ||||
| label: Bank ID | ||||
| payment_ledger.payment_ref | ||||
| label: Paid Ref | ||||
| payment_ledger.amount | ||||
| label: | ||||
| The Due Out value is calculated on the fly depending on the report criteria | ||||
| label: Due Out | ||||
| When Expense Ledger Payment Period IS NOT NULL, only Expense Ledger Payment amounts made matching the criteria should be included in the payment total. Where an {expense_id} has multiple payments out, the amount paid out should be included, not the total paid out. When the report is not in 'Summary' mode, an additional line for each payment should be made below the first matching line just to display the payment details from the {payment_ledger.payment_date}, {payment_ledger.bank_account_id}, {payment_ledger.payment_ref} and {payment_ledger.amount} fields. When the report is not in 'Summary' mode, the 'Due Out' value will be displayed on the last row for each {expense_ledger_id}. If there is only one matching payment the last row is also the first row. When there are multiple payments, the 'Due Out' value will be BLANK on all the rows apart form the last row. The 'Due Out' value is not the value at the time the report is run, it is the calculated value dependant on the search criteria. After the report totals display a summary of the payments by {bank_account_id}. Only display {bank_id} where the report value is NOT ZERO. This will enable cashflow analysis verification. |
||||
{bank_account_id} |
||||
| Report column headings for: Expense Ledger Payments 'by Category' Report heading line 1: 'Report: Audit Expense Ledger Payments by Expense Category' Report heading line 2: 'Report Tax Period: [report start date (dd mmm yyyy)] - [report end date (dd mmm yyyy)] Report heading line 3: 'Expense Ledger Payment Period: [expense ledger payment start date (dd mmm yyyy)] - [expense ledger payment end date (dd mmm yyyy)] |
||||
| Sort Order | ||||
| {expense_ledger.expense_category_id} by name rather than by id {expense_ledger_id.tax_date} {expense_ledger_id} {payment_ledger.payment_date} {payment_ledger.payment_ref} |
||||
| Column Display | ||||
| Same as 'by Date' but no need to display Category column | ||||
| Report column headings for: Expense Ledger Payments 'by Creditor' Report heading line 1: 'Report: Audit Expense Ledger Payments by Creditor' Report heading line 2: 'Report Tax Period: [report start date (dd mmm yyyy)] - [report end date (dd mmm yyyy)] Report heading line 3: 'Expense Ledger Payment Period: [expense ledger payment start date (dd mmm yyyy)] - [expense ledger payment end date (dd mmm yyyy)] |
||||
| Sort Order | ||||
| {expense_ledger.contact_id} {expense_ledger_id.tax_date} {expense_ledger_id} {payment_ledger.payment_date} {payment_ledger.payment_ref} |
||||
| Column Display | ||||
| Same as 'by Date' but no need to display Supplier column | ||||
|
|||||||||||||||||||||||||||||||||||||||||||||||||||||||||||||||||||||
| 140718-03 audit tab43 tab44 |
<function> Accounting > Bank Transactions > Reports > Expense Reports - expense outstanding | |||
In order to calculate Expense Ledger entires with an amount not equal to zero at any particular date a new date field will be added to the existing reports Expenses by Date, Category and Creditor. |
||||
| Report style label | ||||
| Radio control selection for 'by Date' 'by Category' 'by Creditor' | exists already | |||
| Report mode label | ||||
| Summary Totals Only checkbox | exists already | |||
| Report Start Date label | ||||
| Report Start Date input field with date selector | exists already | |||
| Report End Date label | ||||
| Report End Date input field with date selector | exists already | |||
| Report Outstanding Date label | ||||
| Report Outstanding Date input field with date selector | new field | |||
| In this example acres will calculate any expenses with a due out amount NOT EQUAL TO ZERO as at the Report End Date. Report Start Date: 01 Jan 2009 Report End Date: 31 Dec 2009 Report Outstanding Date: 31 Dec 2009 Acres will calculate any expenses within and including the Report Start and End Date {expense_ledger.tax_date} where: Due Out is NOT EQUAL TO ZERO Date Paid is GREATER THAN Report Outstanding Date |
||||
| PMM 130201-07 |
<function> Property Management > Managed Property > Section - add record | ACRES ONLY |
| post delivery additional specification below {pm_section} to be set as ACRES only. All {account_id} will inherit For all {account_id} apart from ACRES there should be no [VIEW] [EDIT] [DELETE] icons. For all {account_id} apart from ACRES display 'ACRES' as {modifier_id} For all {account_id} apart from ACRES do not display {modifier_date} Add a new field to {pm_section} labelled 'inactive' Set value to '1' for all existing records No records to be deleted, just set to inactive. [DELETE] option in ACRES will not delete, just set inactive=0 post delivery additional specification above |
||
| PMM 131107-00 |
<function> Property Management > Managed Property - add record | ||||||
| Connector tables to be used where multiple values possible with start/end dates After selecting [Managed Property] ACRES will offer a Property input field. |
|||||||
| Managed Property - add record | |||||||
| Homeowner {homeowner_contact_id} | |||||||
| SELECT contact name from {contact_id} Character sensitive field. Check against {company_name} AND {firstname} + {lastname} ONLY {contact_id} where {homeowner} is TRUE should be available for selection. |
|||||||
| Property {property_contact_id} | |||||||
| ONLY {property_id} owned by {account_id} available for selection OR {property_id} assigned to {account_id} available for selection character sensitive method |
|||||||
| As characters are input, ACRES filters matching properties for selection. Test characters against system code and address line 1. Select required {property_id} |
|||||||
| dropdown method | |||||||
| {contact_id} ONLY {property_id} connected with {contact_id} in [Contacts] available for selection. If only one Property for Contact then prepopulate field as done in [Calendar Update]. |
|||||||
| Create 'Opening Balance and Date Range' (OBDR) Display Area Display [+] [+/-] subject to conditions. On initial display the [+] icon only to be displayed if there are no OBDR records. |
|||||||
| then only display [+/-] when OBDR records exist. | |||||||
| Where no OBDR record exists for a property [+/-] will not display as there are no records to display on expand. [+] will display allowing users to add the first OBDR record. Once an OBDR record exists, [+/-] will now display to allow users to expand/collapse the OBDR Display Area. Where a service record does exist for a property, only [+/-] will display in collapsed mode. [+] will only become visible in expanded mode. When [+] selected, ACRES to check if {homeowner_contact_id}{property_contact_id} is UNIQUE |
|||||||
| IF {homeowner_contact_id}{property_contact_id} not unique AND IF {homeowner_contact_id}{property_contact_id} is not current record THEN dislay message |
|||||||
| 'this combination of homeowner and property already exists ({pm_managed_property_id}). Edit existing record | |||||||
| Existing {pm_managed} can still be used. The introduction of parent/child fields may be useful to track relationships of multiple records fr the same {homeowner_contact_id}{property_contact_id} combinations. | |||||||
| ACRES DATE LOGIC applies for Add/Edit OBDR Display Area will display column headings: |
|||||||
| Opening Balance | | Start Date | | End Date | |||||
| By using the OBDR method, ACRES can track multiple unique {homeowner_contact_id}{property_contact_id} where the same homeowner and property come in ad out of property management without having to create a new {pm_managed_id} each time. This method will also allow for the correct calculations on HoS taking into acclount all other logic with {pm_lock_date} and OBDR. |
|||||||
| Opening Balance | |||||||
| numeric 2 decimal places. Value used from PM Start Date. Cannot be changed after first Management Report {pm_lock_date} as will affect all subsequent reports. ie LOCKED where {pm_managed_start_date < {pm_lock_date} cannot be NULL Set to '0.00 on [POST] if no value input |
|||||||
Start Date |
will be the dates user wants ACRES to start keeping record and not necessarily the date user actually started managing the property | ||||||
| cannot be NULL cannot be < {pm_lock_date} cannot be inside an exisitng date range |
|||||||
| on [POST] display warning message relevant to logic failure | |||||||
| WHERE {pm_managed_start_date} < {pm_lock_date} {homeowner_contact_id} is LOCKED {property_contact_id} is LOCKED |
|||||||
| End Date |
will be null for all Properties that user is currently managing | ||||||
| can be NULL for current record only cannot be inside an exisitng date range |
|||||||
| on [POST] display warning message relevant to logic failure | |||||||
| PMM 130201-12 131020-00 |
<function> Property Management > Managed Property > Escrow | ||
| ACRES Start Date Logic in addition to 130201-12 |
|||
| Escrow Start Date (PM_Escrow_Start_Date) |
|||
| cannot be NULL cannot be inside an exisitng date range cannot be < {pm_managed_start_date} |
|||
| ACRES not to permit a record being created where the start date is LESS THAN the start date of the property being managed. Warn user to use a date that is => (equal to orgreater than) {pm_managed_start_date} OR Amend {pm_managed_start_date} |
|||
| cannot be > {pm_managed_end_date} | |||
| ACRES not to permit a record being created where the start date GREATER THAN the end date of the property being managed. Warn user to use a date that is earlier than {pm_managed_end_date} OR Amend {pm_managed_end_date} |
|||
| PMM 131007-02 |
<function> Property Management > Managed Property - Managed Service | |||||||
| <start code verify Create Managed Service Display Area under Escrow Display Area Display [+] [+/-] subject to conditions. On initial display the [+] icon only to be displayed if there are no service records for the property. |
||||||||
| then only display [+/-] if service records exist | ||||||||
| Where no service record exists for a property [+/-] will not display as there are no records to display. [+] will display allowing users to add the first service record. Once a service record exists, [+/-] will now display to allow users to expand/collapse the SDA. Where a service record does exist for a property, only [+/-] will display in collapsed mode. [+] will only become visible in expanded mode. |
||||||||
| ACRES DATE LOGIC applies for Add/Edit | ||||||||
| Managed Service Display Area will display column headings: | ||||||||
| Managed Service | Start Date | End Date | ||||||||
| ONLY {pm_service} create by {account_id} available for selection | ||||||||
| Managed Service | drop down field showing service name populated by {pm_service.service} | |||||||
| IF {pm_lock_date} > {pm_service_end_date} THEN {pm_service} not available for selection |
||||||||
| IF {pm_managed_service_start_date} > {pm_lock_date} THEN can be changed to another {pm_service_id} |
||||||||
| eg a service is added and prior to running a HoS the user chooses to change to another service | ||||||||
| IF {pm_managed_service_end_date} < {pm_lock_date} THEN cannot be changed to another {pm_service_id} |
||||||||
| eg records could already be created on HoS so change not permitted as the change would affect historical records | ||||||||
| {pm_service} < {pm_lock_date} being displayed in drop down end of code verify>(incomplete 28Oct2013) <start code verify |
||||||||
| Start Date | cannot be inside an exisitng date range INCLUDING start/end dates for matching {pm_managed_service_id} cannot be > {pm_managed_service_end_date} cannot be NULL cannot be > {pm_managed_end_date} |
|||||||
| ACRES not to permit a record being created where the start date is greater than the end date of the property being managed. Warn user to use a date that is earlier than {pm_managed_end_date} OR Amend {pm_managed_end_date} |
||||||||
| End Date | cannot be inside an exisitng date range INCLUDING start/end dates for matching {pm_managed_service_id} cannot be < {pm_managed_service_start_date} can be NULL for current record only |
|||||||
| IF a record exists which is already NULL then ACRES to display message to place an End Date in existing record before new record can be created IF there is no {pm_service} with a current record (one with a NULL End Date) THEN {pm_managed_service_end_date} will be set and LOCKED = highest {pm_service_end_date} On mouseover GUI to display text explaining that {pm_service} has expired. |
||||||||
| [X] | display [X] delete option WHERE {pm_managed_service_start_date} AND {pm_managed_service_end_date} are NULL |
|||||||
| eg when a new record is added and user does not wish to save | ||||||||
| WHERE {pm_managed_service_start_date} > {pm_lock_date} | ||||||||
| <<< Additonal logic to be applied once {pm_managed_service_bundle} has been created >>> | ||||||||
| [POST] | In addition to {pm_managed_service} additional logic must be performed to ensure Services are not duplicated on a HoS. As a Service can be applied standalone or as part of a Service Bundle, ACRES must validate that the Service being added/amended {pm_service_id} does not already exist within the same time period within {pm_managed_service_bundle}. |
|||||||
| eg Current date = 01 Mar 2012 Pool Service exist in a Service Bundle starting 01 Jan 2012 with no end date so is valid until an end date is applied. The Service Bundle is included in a {pm_managed_service_bundle} for a Homeowner with a start date of 01 Feb 2012 and no end date. If Pool Service was added as a standalone {pm_managed_service} the record would not save as the Service would be duplicated. Once in {pm_managed_service_bundle} and again in {pm_managed_service} |
||||||||
| Error message would need to display: 'Service already exists in Managed Service Bundle' In order to add Service to HoS one of the following actions must be completed: Apply an End Date to Managed Service Bundle within this Property where Service is already included. OR Apply and End Date to [Managed Property > Service Bundle] |
||||||||
| PMM 131018-00 |
{table} pm_managed_service_bundle | ||
| Create {pm_managed_service_bundle} This section specified for local user. Consideration needs to be included for global ACRES table structures. Only records created by {account_id} to be available for use. |
|||
| pm_managed_service_bundle_id | |||
| auto increment from 0 for {account} counter cannot be NULL |
|||
| pm_managed_id | |||
| from {pm_managed} will be known as record created within pm_managed like {pm_managed_service} cannot be NULL |
|||
| pm_service_bundle_id | |||
| from {pm_service_bundle} cannot be NULL |
|||
| Where {pm_service_bundle_period} = 'calendar month' apply pricing on the 1st of the month. As {pm_service_bundle} has an end date any updates to pricing in {pm_service_bundle} will automatically be reflected on the HoS. This relationship will continue until {pm_service_bundle} has an End Date set or {pm_managed_service_bundle_end_date} is not NULL. Where {pm_service_bundle_period} = 'unit' apply pricing on {pm_managed_service_bundle_start_date} As this is a one at a time transaction the {pm_managed_service_bundle_end_date} will be set to equal {pm_managed_service_bundle_start_date} and be LOCKED. |
|||
| pm_managed_service_bundle_start_date | |||
| use START description rather than from/to, from/until cannot be NULL |
|||
| pm_managed_service_bundle_end_date | |||
| use END description rather than from/to, from/until can be NULL = {pm_managed_service_bundle_start_date} where {pm_service_period} = 'unit' |
|||
| pm_managed_service_bundle_updater | |||
| from {account.user_id} cannot be NULL |
|||
| updated | |||
| date/time stamp but only display date cannot be NULL |
|||
| deleted | |||
| true/false default = false cannot be NULL |
|||
| PMM 131018-01 |
<function> Property Management > Managed Property - Managed Service Bundle | |||||||
| Create Managed Service Bundle Display Area under Managed Service Display Area Display [+] [+/-] subject to conditions. On initial display the [+] icon only to be displayed if there are no service bundle records for the property. |
||||||||
| then only display [+/-] if service records exist | ||||||||
| Where no service record exists for a property [+/-] will not display as there are no records to display. [+] will display allowing users to add the first service record. Once a service record exists, [+/-] will now display to allow users to expand/collapse the SDA. Where a service record does exist for a property, only [+/-] will display in collapsed mode. [+] will only become visible in expanded mode. |
||||||||
| ACRES DATE LOGIC applies for Add/Edit | ||||||||
| Managed Service Bundle Display Area will display column headings: | ||||||||
| Managed Service Bundle | Start Date | End Date | ||||||||
| Managed Service Bundle | drop down field showing service bundle name populated by {pm_service_bundle.label} | |||||||
| IF {pm_lock_date} > {pm_service_bundle_end_date} THEN {pm_service_bundle} not available for selection |
||||||||
| IF {pm_managed_service_bundle_start_date} > {pm_lock_date} THEN can be changed to another {pm_service_bundle_id} |
||||||||
| eg a service bundle is added and prior to running a HoS the user chooses to change to another service bundle | ||||||||
| IF {pm_managed_service_bundle_end_date} < {pm_lock_date} THEN cannot be changed to another {pm_service_bundle_id} |
||||||||
| eg records could already be created on HoS so change not permitted as the change would affect historical records | ||||||||
| Start Date | cannot be inside an exisitng date range INCLUDING start/end dates for matching {pm_managed_service_bundle_id} cannot be > {pm_managed_service_bundle_end_date} cannot be NULL cannot be > {pm_managed_end_date} |
|||||||
| ACRES not to permit a record being created where the start date is greater than the end date of the property being managed. Warn user to use a date that is earlier than {pm_managed_end_date} OR Amend {pm_managed_end_date} |
||||||||
| End Date | cannot be inside an exisitng date range INCLUDING start/end dates for matching {pm_managed_service_id} cannot be < {pm_managed_service_bundle_start_date} can be NULL for current record only |
|||||||
| IF a record exists which is already NULL then ACRES to display message to place an End Date in existing record before new record can be created | ||||||||
| IF there is no {pm_service_bundle} with a current record (one with a NULL End Date) THEN {pm_managed_service_bundle_end_date} will be set and LOCKED = highest {pm_service_bundle_end_date} On mouseover GUI to display text explaining that {pm_service_bundle} has expired. |
||||||||
| [X] | display [X] delete option WHERE {pm_managed_service_bundle_start_date} AND {pm_managed_service_bundle_end_date} are NULL |
|||||||
| eg when a new record is added and user does not wish to save | ||||||||
| WHERE {pm_managed_service_bundle_start_date} > {pm_lock_date} | ||||||||
| <<< Additonal logic to be applied once {pm_managed_service} has been created >>> | ||||||||
| [POST] | In addition to {pm_managed_service_bundle} additional logic must be performed to ensure Services are not duplicated on a HoS. As a Service can be applied standalone or as part of a Service Bundle, ACRES must validate that the Service being added/amended {pm_service_id} does not already exist within the same time period within {pm_managed_service}. |
|||||||
| eg Current date = 01 Mar 2012 Pool Service exists in {pm_service} starting 01 Jan 2012 with no end date so is valid until an end date is applied. The Service is included in a {pm_managed_service} for a Homeowner with a start date of 01 Feb 2012 and no end date. If Pool Service is included in a {pm_managed_service_bundle} being added, the record would not save as the {pm_service_id} would be duplicated. Once in {pm_managed_service} and again in {pm_managed_service_bundle} |
||||||||
| Error message would need to display: 'Service already exists in Managed Service' In order to add Service Bundle to HoS one of the following actions must be completed: Apply an End Date to Managed Service within this Property OR Apply Service Bundle that does not include the Service |
||||||||
| PMM 131008-01 |
<function> Property Management > Homeonwer Statements | ||||
| This feature limited to local {account} only. No cross {account} function. There is no {table} definition as the data being displayed already exists. The issue of opening and closing balances will be address on statement production as this does not affect record display. The list is ongoing and statements are produced to provide an overview of the records for a homeowners benefit. Homeowner Statements will be produced on a single home basis. If a situation required multi-property reporting for a single {contact_id} then the issue will be addressed at that time. Select [Homeowner Statements] |
|||||
| HoS Report Start Date | |||||
| freehand entry permitted display calendar icon for date picker can be NULL <= HoS Report End Date |
|||||
| Althought the field is empty on initial display and can be populated by freetext or date picker there also needs to be a dropdown arrow populated as follows: current period = {pm_lock_date} + 1 month (eg pm lock date 31 Jan 2012 then current = Feb 2012) last calendar month = calendar month/year prior to {pm_lock_date} month/year - Start/End dates will then be automatically populated last 3 calendar months = 1st of month/year minus 4 prior to {pm_lock_date} month/year - End Date will be set to last of month/year minus 2 prior to {pm_lock_date} month/year - Start/End dates will then be automatically populated |
|||||
| HoS Report End Date | |||||
| freehand entry permitted display calendar icon for date picker can be NULL >= HoS Report Start Date |
|||||
| Homeowner Contact ID | |||||
| can be NULL only {contact} for {account} to be available for selection. Logic should already exist from {pm_managed} if one entity owns multiple properties this feature will enable all required properties to be listed without loading the codes individually. |
|||||
| Property ID | |||||
| from {property} can be NULL input by character sensitive check against {system_code} AND {address_line1} so user can type system code or 1st line of address to narrow available selection. Only {property_id} from {pm_managed} will be available for selection. [+] to add Property to INPUT WINDOW [] checkbox to the right of the [+] selection 'display inactive properties'. Default = unchecked |
|||||
| when the 'display inactive properties' checkbox is TRUE, there is no validation against {pm_managed} where report start/end date not null, validate before adding to display IF HoS Report Start Date is not NULL AND HoS Report Start Date >= {pm_managed.start_date} AND <= {pm_managed.end_date} OR {pm_managed.end_date} is NULL THEN {property_id} available for selection ELSE IF HoS Report End Date is not NULL AND HoS Report End Date >= {pm_managed.start_date} AND <= {pm_managed.end_date} OR {pm_managed.end_date} is NULL THEN {property_id} available for selection ELSE {property_id} not available for selection - display message to user explaining why it is not able to add selected property eg 'HoS Report Start Date earlier than pm_managed start date' eg 'HoS End Date later than pm_managed end date' This same validation needs to take place on [POST] in edit mode in case the Report Start/End dates are amended after the record has been completed having passed a prior validation check. |
|||||
| On [POST] matching properties will be listed in an individual Property Display Area. The first line of each Property Display Area will show: |
|||||
| System Code | |||||
| [+/-] expand/collapse icon [s] statement icon |
|||||
| icon required to indicate a calendar as this view is by calendar month | |||||
| [X] not required | |||||
| The second line of each Property Display Area will show: | |||||
| Address Title (if exists) Address Line 1 |
|||||
| [+/-] expand/collapse view | |||||
| All records displayed in this order: {pm_section_section.sort_order} {pm_service_bundle_label.sort_order} {pm_service_service.sorrt_order} |
|||||
| [s] statement view | |||||
| period to be displayed by descending month/year gui display in format suitable for creating a pdf for a homeowner or pdf generator like booking advice on a per period basis statement view does not need to show {contact_id} details as these will be displayed on the print view statement statement view to show: |
|||||
| heading for month / year period opening balance period records with amounts in debit/credit columns like a bank statement |
|||||
| All records displayed in this order: {pm_section_section.sort_order} {pm_service_bundle_label.sort_order} {pm_service_service.sorrt_order} |
|||||
| sub totals per section period closing balance produce statement button |
|||||
| this will show the period statement in a new window (like financial reports) showing the {contact_id} as per a printed HoS | |||||
| Example: {contact_id} only selected | |||||
| on [POST] only properties matching the {homeowner_contact_id} to be displayed properties where current date > {pm_managed.end_date} will not be displayed when 'display inactive properties' checkbox is TRUE, ALL {pm_managed} will be displayed |
|||||
| Example: [+/-] last 3 calendar months | |||||
| 3 records from each {managed_property.property_id} will display per property in date descending order | |||||
| {hos_report_start_date} = 01 Jan 2012 {hos_report_end_date} = 31 Mar 2012 |
|||||
| each matching {managed_property.property_id} would have 3 records available for viewing Mar 2012 Feb 2012 Jan 2012 |
|||||
| selecting a period will display on screen the records within the period select 'produce statement button to create hard copy for backup or email |
|||||
| Owners using Calendar Updater will require historical monthly views of HoS where the PMC uses ACRES. | |||||
| Future specification of this module for phase 2 of PMM | |||||
| forecast view based on average historical data of management fees and expenses and known advance reservations | |||||
| use PM lock date to store hos balances or some other counter such as year start / end to avoid ACRES having to calculate large amounts of historical records to get current balances | |||||
| 131021-00 | <function> GUI Display Area on [POST] | |
| On [POST] ACRES gui to return to Display Area options gui rather than Selected Menu gui on [POST] If no records added or amended then [POST] to be disabled. |
||
| Example: [menu] Managed Property selected |
||
| gui will show Selected Menu gui for {pm_managed} | ||
| [EDIT] gui will show for selected Property | ||
| Escrow Display Area Managed Service Display Area Managed Service Bundle Display Area |
||
| IF [+/-] selected in ANY Display Area but no record change has taken place THEN [POST] disabled |
||
| IF [+/-] selected in ANY Display Area and record change has taken place THEN [POST] enabled |
||
| After record validation logic has passed gui should not return to {pm_managed} gui. ACRES to show Display Areas in collapsed mode still within the selected {pm_managed} |
||
| 130818-02 | <function> Operations > Setup > Expense Categories | |||
| 20Jan2014 logic still to be tested ACRES should only display {expense_category} where {expense_category.account_id} = {user_id.account.id} No records should be deleted. Just set record to inactive if no longer in use as there may be exisiting entries using the id. To disable a category for selection: |
||||
| either | ||||
| select [EDIT] | ||||
| change {expense_category_active} to '0' | ||||
| select [POST] | ||||
| or | ||||
| select [DELETE] | ||||
| display message 'record will be set to inactive OK/Cancel' | ||||
| IF [OK] set {expense_category_active} value to '0' | ||||
| ELSE IF [CANCEL] ignore and return to previous GUI | ||||
| ADD/EDIT On [POST] ACRES must check if {expense_category_name} field value already exists (case insensitive) within matching {account_id}. |
||||
| IF {expense_category_name} exists and {expense_category_active} = '1' THEN display message |
||||
| 'record already exists' [OK] select [OK] no records updated |
||||
| ELSE IF
{expense_category_name} exists and {expense_category_active} = '0' THEN display message |
||||
| 'inactive record already exists, set to active' [OK] [CANCEL] | ||||
| select [OK] | ||||
| selected record not updated exisiting record {expense_category_active} set to '1' |
||||
| select [CANCEL] | ||||
| no records updated and return to previous GUI | ||||
| Additional specification to link {expense_category} to {expense_group} from [Expense Categories] On the existing display add a new label 'Expense Group] and a display field {expense_group_name} with a drop down arrow. Only Super Users or higher should be permitted to change the Expense Group link. To use the new function: Select [Expense Categories] Select [edit] icon (same will apply for new {expense_category}). If the {expense_category} has already been linked then the {expense_group_name} will be displayed otherwise the field will be blank. Use the drop down function to select the required Expense Group. Select [post] IF {expense_group_id} is NULL THEN display warning to user that 'Expense Category must be linked to an Expense Group' 'OK to select Expense Group or Cancel to abandon insert/edit' OK = go back to input screen so user can select Expense Category Cancel = abandon record insert/edit. Go back to Expense Categories display GUI. |
||||
| 130818-05 | <function> Operations > Setup > Expense Group | |||||||
| 20Jan2014 logic still to be tested Select [Expense Group] By default inactive records whose {Status} is set to TRUE will not be displayed. If a user creates an entry where the {expense_group_name} is an exact match then the status flag will just be set to FALSE (unchecked) and the record will become available for use. When user selects menu item no records will be displayed. Items available will be: <Custom Filter>, Checkbox with label 'Show inactive records', <Apply Filter> <reset filter> <Add record>. Where <Apply Filter> is selected without any filter criteria, records will be displayed ASCENDING by {Sort Order}. Only records with a matching {account_id} to the user {account_id} to be displayed. Edit Icon will be displayed subject to user security level. Users will NOT be allowed to delete records. They will need to change the Status. When creating a new record, on save the new record is to appear on the top of the list so records to be displayed DESCENDING by id. Add record |
||||||||
| ID | ||||||||
| auto on post | ||||||||
| Expense Group | ||||||||
| add label | ||||||||
| Status | ||||||||
| active on record post | ||||||||
| Expense Group table example | ||||||||
| ID | Type | Sort Order | Inactive | Account | User | Update Date | ||
| 1 | Fixed Assets | 100 | false | 2 | 36 | 08/18/2013 | ||
| 2 | General & Administrative | 10 | false | 2 | 36 | 08/18/2013 | ||
| 3 | Insurances | 20 | false | 2 | 36 | 08/18/2013 | ||
| 4 | Professional Fees | 30 | false | 2 | 36 | 08/18/2013 | ||
| Once a record has been created Expense Categories can be added using the [+] icon. With Expense Group displayed select the [edit] icon for the Expense Group that will have an Expense Category linked. Display the [+] icon below the Expense Group information. Display a Expense Category selection field below the [+] icon with a drop down arrow. Initially this field will be disabled. Below this display a list of all Expense Categories that have already been linked to the Expense Group. As from this point forward all Expense Categories must be lonked to an Expense Group, there will be no [delete] icon display next to the Expense Category. To remove an Expense Category from an Expense Group the Expense Category must be linked to the required Expense Group using [edit] for the required Expense Group. Select [+] The Expense Category selection field will now be enabled. Using the drop down any Expense Category not already linked to the Expense Group will be available for selection. Select the required Expense Category. Select [post] IF the Expense Category is not already linked to an Expense Group THEN {expense_ledger] will store {expense_group_id} ELSE IF {expense_ledger: expense_group_id} is not null THEN display warning to user that {expense_category_name} is already linked to {expense_group_name} OK to change link to new [expense_group_name} or Cancel |
||||||||
| PMM 130207-02 |
<function> Operations > Setup > PM EL Description | |||||||
As a very high percentage of descriptions are repeated over HoS so these can be pre-defined. |
||||||||
| {ACRES}{pm_el_description.sort_order} | ||||||||
| all active ACRES records to be displayed | ||||||||
| followed by {account_id}{pm_el_description.sort_order} | ||||||||
| all active ACRES records to be displayed | ||||||||
| [EDIT] only available in {account_id} that created the {pm_el_description} When selected, ACRES to display message that changes will affect records in the PMM. OK to continue / Cancel. Users will NOT be allowed to delete records. They will need to change the Status. [DELETE] icon can be used to set status to inactive. above to be checked once module live When creating a new record, on save the new record is to appear on the top of the list so records to be displayed DESCENDING by {account_id}{pm_el_description_id} Records inherited from {ACRES} to be displayed as view only AND records created by {account_id} to be displayed with [VIEW][EDIT][DELETE] Any records created by another {account_id} should NOT be displayed. |
||||||||
| Create table {pm_el_description} | ||||||||
| ID | ||||||||
| auto unique generated by ACRES | ||||||||
| Description | ||||||||
| text 75 characters to start | ||||||||
| Sort Order | ||||||||
| cannot be NULL Set to '0' on post if no value inserted. User can edit later. Sort Order may be used to determin display order on HoS. |
||||||||
| Status | ||||||||
| checkbox used/unused. The default value is false (unchecked) so the record will appear for selection in the PMM. When a User changes the value to TRUE the record will no longer be available for selection in the PMM. |
||||||||
| Updater | ||||||||
| {user_id} from logon display Username if Username belongs to ACRES {account_id} display 'ACRES' |
||||||||
| Updated | ||||||||
| create date/time when record created updated date/time when record edited or deleted |
||||||||
| Account ID | ||||||||
| auto from logon {user_id} does not need to be displayed on any account other than ACRES used to determin when to display record if {account_id} matches {user_id.account_id} |
||||||||
| PM EL Description table example | ||||||||
| ID | Type | Sort Order | Status | Updater | Updated | Account | ||
| 1 | bulb stock | 20 | active | ACRES | 2013-07-29 10:06:39 | 1 | ||
| 2 | a/c filter stock | 10 | active | ACRES | 2013-07-29 10:06:50 | 1 | ||
| 3 | linens | 120 | active | ACRES | 2013-07-29 10:06:59 | 1 | ||
| 4 | towels | 200 | active | ACRES | 2013-07-29 10:07:19 | 1 | ||
| 51 | bi annual front door batteries | 100 | active | Danger Mouse | 2013-08-24 11:29:10 | 2 | ||
| PMM 130207-09 |
{table} pm_el_connector | |||||||
The function of {pm_el_connector} will connect {expense_ledger} records to {pm_expense_ledger}. |
||||||||
| {pm_el_connector} | ||||||||
| Expense Ledger ID | ||||||||
| from {expense_ledger} | ||||||||
| PM Expense Ledger ID | ||||||||
| from {pm_expense_ledger} | ||||||||
| EL Total | ||||||||
| {total_amount} from {expense_ledger} | ||||||||
| Markup | ||||||||
| from {markup_id} Display will show {markup_key} as more user friendly |
||||||||
| Markup Amount | ||||||||
| numeric two decimal places the actual value after Markup applied To charge an amount to a HoS that is less than the EL Total a NEGATIVE value can be applied |
||||||||
| Example PM EL Connector Table | ||||||||
| ID | EL ID | PM EL ID | EL Total | Markup | Markup Amount | |||
| 1 | 7712 | 32 | 117.34 | X | 175.00 | |||
| 2 | 7711 | 33 | 305.00 | X | 50.00 | |||
| 3 | 7711 | 34 | 305.00 | X | 25.00 | |||
| 4 | 7711 | 35 | 305.00 | X | 35.00 | |||
| 5 | 7711 | 36 | 305.00 | X | 60.00 | |||
| 6 | 7711 | 37 | 305.00 | X | 175.00 | |||
| 7 | 7711 | 38 | 305.00 | X | 175.00 | |||
| 8 | 7618 | 39 | 63.54 | $ | 2.00 | |||
| 9 | 7715 | 40 | 10 | % | 20.00 | |||
| 10 | 7999 | 98 | 20.00 | S | 17.50 | |||
| 11 | 7999 | 99 | 20.00 | S | 17.50 | |||
| In the example the EL ID 7711 Total is 305.00 and the amounts charged to the HoS are in excess of this value. | ||||||||
| PMM 130207-10 |
{table} pm_expense_ledger | ||||||||
This is specified as a standalone table which may connect to {expense_ledger} through a connector table {pm_el_connector}. |
|||||||||
| PM Expense Ledger | |||||||||
| {pm_expense_ledger} | |||||||||
| Expense Ledger ID | |||||||||
| from {expense_ledger} can be NULL if NULL then record is a standalone record with no connection to {expense_ledger} if not NULL then use GUI HEADER WINDOW for user reference to display from {expense_ledger}: Tax Date, Contact Name, Description, Total Amount |
|||||||||
| Date | |||||||||
| default today cannot be NULL This is the actual date of the expense/fee. Will be {tax_date} from {expense_ledger} if Expense Ledger ID is not NULL and LOCKED. |
|||||||||
| HoS Date | |||||||||
| default today or as {pm_expense_ledger.date} if Date greater than {pm_lock_date} cannot be NULL must be greater than {pm_lock_date} can be less than Date so long as other conditions met |
|||||||||
| Contact ID | |||||||||
| from {contact} can be NULL will be {contact_id} from {expense_ledger} if Expense Ledger ID is not NULL and LOCKED. cannot be NULL on SAVE if Key = UB from {pm_hos_key} User to select name from drop down menu of Contacts flagged as Expense Ledger Suppliers only. HoS to display Company Name or Firstname Lastname if Company Name NULL. |
|||||||||
| PM HoS Key ID | |||||||||
| from {pm_hos_key_id} cannot be NULL WHERE {expense_ledger_id} is NOT NULL - default display = 'Misc Expense' |
|||||||||
| PM EL Description ID | |||||||||
| from {pm_el_description_id} ACRES to offer drop down selection populated by {Description}. the id is stored when selected. The first entry in the selection will be hardcoded 'freehand' which means User wants to input manually. Value=NULL for 'freehand' entry if {expense_ledger_id} is not NULL then Desciption selection will have 2 rows each with a radio control button for selection: 1st row will display text from {expense_ledger_description} 2nd row as above with drop down selection populated by {Description} |
|||||||||
| Description | |||||||||
| where {pm_el_description_id} is not NULL display 'Description' from {pm_el_description}. It will not be possible to edit this field as it has been inherited. WHERE {expense_ledger_id} is NOT NULL - default display = {expense_ledger_description} where {pm_el_description_id} is NULL allow freehand entry with field width setting equivalent to Description field in {pm_el_description}. On record save, prompt User if they want to save Description to PM EL Description table for easy reuse. If yes then create new record in {pm_el_description} with Sort Order=0. A Sort Order of zero means the descrition will appear first the next time the function is used and will serve as a prompt for user to edit if required. The {pm_el_description_id} will be populated with the new ID the the Description field will become LOCKED. If Description is an exact match with an exisiting record in {pm_el_description} AND {pm_el_description} Status is FALSE THEN populate {pm_el_description_id} with the exisitng ID. DO NOT create new record in {pm_el_description}. Save record in this table. If Description is an exact match with an exisiting record in {pm_el_description} AND {pm_el_description} Status is TRUE THEN populate {pm_el_description_id} with the exisitng ID. DO NOT create new record in {pm_el_description}. Change the Status in {pm_el_description} to FALSE. Save record in this table. This method is also a quick way of populating the table without users having to spend time ahead of preparing HoS. |
|||||||||
| {pm_el_connector} | |||||||||
| Property ID | |||||||||
| from {property} cannot be NULL input by character sensitive check against {system_code} AND {address_line1} so user can type system code or 1st line of address to narrow available selection. Only {property_id} from {pm_managed} will be available for selection. [+] to add Property to INPUT WINDOW |
|||||||||
| validate against {pm_managed} before adding to list IF hos_date >= {pm_managed.start_date} AND <= {pm_managed.end_date} OR {pm_managed.end_date} is NULL THEN {property_id} available for selection ELSE {property_id} not available for selection - display message to user explaining why it is not able to add selected property eg 'hos_date earlier than pm_managed start date' eg 'hos_date after pm_managed end date' This same validation needs to take place on [POST] in edit mode in case the hos_date is changed after the record has been completed having passed a prior validation check. |
|||||||||
| Total | |||||||||
| only available if Expense Ledger ID not NULL value =
{total_amount} from {expense_ledger} otherwise field not available from input. User to complete HoS Total. |
|||||||||
| Markup | |||||||||
| only available if Total not NULL. from {markup} drop down to offer Markup Name selection from {markup}. Store markup_id in {pm_el_connector} |
|||||||||
| Value | |||||||||
| the numerical value of the markup can be NULL can be NEGATIVE |
|||||||||
| HoS Total | |||||||||
| numeric with set 2 decimal places cannot be NULL if NULL on record save warn user that value is '0.00', ok to continue or change value. For standalone records the HoS Total is the amount input by the user. For entries where Expense Ledger ID not NULL then HoS Total is calculated as a result of Total/Markup/Value. |
|||||||||
| PMM 130207-11 |
Property Management: PM Expense Ledger | ||||||||
This is specified as a standalone table which may connect to the Expense Ledger table through a connector table {pm_el_connector}. |
|||||||||
| PM Expense Ledger | |||||||||
| Create table {pm_expense_ledger} | |||||||||
| <start of code verify Expense Ledger ID |
|||||||||
| from {expense_ledger} can be NULL if NULL then record is a standalone record with no connection to {expense_ledger} if not NULL then use GUI HEADER WINDOW for user reference to display from {expense_ledger}: Tax Date, Contact Name, Description, Total Amount end of code verify>(incomplete 06Oct2013) |
|||||||||
| <start of code verify Date |
|||||||||
| default today cannot be NULL This is the actual date of the expense/fee. Will be {tax_date} from {expense_ledger} if Expense Ledger ID is not NULL and LOCKED. end of code verify - COMPLETED> |
|||||||||
| <start of code verify HoS Date |
|||||||||
| default today or as Date if Date greater than {pm_lock_date} cannot be NULL must be greater than {pm_lock_date} less than Date permitted |
|||||||||
| end of code verify - COMPLETED> | |||||||||
| below: test when Homeowner Statements ready An expense can be input with a {pm_expense_ledger_date} that is prior to the {pm_lock_date}. The HoS will display the record according to the HoS Date and display the {pm_expense_ledger_date} in (parenthisis) to show it was for a prior period but being applied in a current period. See example below. above: test when Homeowner Statements ready |
|||||||||
| Contact ID | |||||||||
| from {contact} can be NULL will be {contact_id} from {expense_ledger} if Expense Ledger ID is not NULL and LOCKED. cannot be NULL on SAVE if Key = UB from {pm_hos_key} User to select name from drop down menu of Contacts flagged as Expense Ledger Suppliers only. HoS to display Company Name or Firstname Lastname if Company Name NULL. |
|||||||||
| PM HoS Key ID | |||||||||
| from {pm_hos_key_id} cannot be NULL WHERE {expense_ledger_id} is NOT NULL - default display = 'Misc Expense' |
|||||||||
| PM EL Description ID | |||||||||
| from {pm_el_description_id} ACRES to offer drop down selection populated by {Description}. the id is stored when selected. The first entry in the selection will be hardcoded 'freehand' which means User wants to input manually. Value=NULL for 'freehand' entry if {expense_ledger_id} is not NULL then Desciption selection will have 2 rows each with a radio control button for selection: 1st row will display text from {expense_ledger_description} 2nd row as above with drop down selection populated by {Description} |
|||||||||
| Description | |||||||||
| where {pm_el_description_id} is not NULL display Description from {pm_el_description}. It will not be possible to edit this field as it has been inherited. WHERE {expense_ledger_id} is NOT NULL - default display = {expense_ledger_description} where {pm_el_description_id} is NULL allow freehand entry with field width setting equivalent to Description field in {pm_el_description}. On record save, prompt User if they want to save Description to PM EL Description table for easy reuse. If yes then create new record in {pm_el_description} with Sort Order=0. A Sort Order of zero means the descrition will appear first the next time the function is used and will serve as a prompt for user to edit if required. The {pm_el_description_id} will be populated with the new ID the the Description field will become LOCKED. If Description is an exact match with an exisiting record in {pm_el_description} AND {pm_el_description} Status is FALSE THEN populate {pm_el_description_id} with the exisitng ID. DO NOT create new record in {pm_el_description}. Save record in this table. If Description is an exact match with an exisiting record in {pm_el_description} AND {pm_el_description} Status is TRUE THEN populate {pm_el_description_id} with the exisitng ID. DO NOT create new record in {pm_el_description}. Change the Status in {pm_el_description} to FALSE. Save record in this table. This method is also a quick way of populating the table without users having to spend time ahead of preparing HoS. |
|||||||||
| The next part of this function will enable multiple records to be created on a single SAVE/POST. In addition to multiple Properties, each Property can have a different Markup method and value applied. This should appear below a horizontal line break. |
|||||||||
| Below the Property selection window will be a checkbox with the wording 'apply same markup policy to entire list' when selected, only the value fields first row will be enabled and will be applied to every property added to the list. The INPUT WINDOW will display a single row for each selected Property. System Code | Total | Markup | Value | HoS Total |
|||||||||
| Property ID | |||||||||
| from {property} cannot be NULL input by character sensitive check against {system_code} AND {address_line1} so user can type system code or 1st line of address to narrow available selection. Only {property_id} from {pm_managed} will be available for selection. [+] to add Property to INPUT WINDOW |
|||||||||
| validate against {pm_managed} before adding to list IF hos_date >= {pm_managed.start_date} AND <= {pm_managed.end_date} OR {pm_managed.end_date} is NULL THEN {property_id} available for selection ELSE {property_id} not available for selection - display message to user explaining why it is not able to add selected property eg 'hos_date earlier than pm_managed start date' eg 'hos_date after pm_managed end date' This same validation needs to take place on [POST] in edit mode in case the hos_date is changed after the record has been completed having passed a prior validation check. |
|||||||||
| Total | |||||||||
| only available if Expense Ledger ID not NULL value =
{total_amount} from {expense_ledger} otherwise field not available from input. User to complete HoS Total. |
|||||||||
| Markup | |||||||||
| only available if Total not NULL. from {markup} drop down to offer Markup Name selection from {markup}. Store markup_id in {pm_el_connector} |
|||||||||
| Value | |||||||||
| the numerical value of the markup can be NULL can be NEGATIVE |
|||||||||
| HoS Total | |||||||||
| numeric with set 2 decimal places cannot be NULL if NULL on record save warn user that value is '0.00', ok to continue or change value. For standalone records the HoS Total is the amount input by the user. For entries where Expense Ledger ID not NULL then HoS Total is calculated as a result of Total/Markup/Value. |
|||||||||
| [X] should not be available where {hos_date} <= {pm_lock_date} | |||||||||
| as the homeowners statements would already be completed, a new record should be created to reverse/adjust a value to a current HoS | |||||||||
| Example Input Window for connected entry with multiple Properties: 'apply same markup policy to entire list' checked |
|||||||||
| System Code | Total | Markup | Value | HoS Total | On SAVE/POST this would create 4 records in {pm_expense_ledger} AND {pm_el_connector} |
||||
| ORLGR3H007 | 200.00 | Percentage | 25.00 | 50.00 | |||||
| ORLGR3H019 | locked | locked | locked | locked | |||||
| ORLGR4H001 | locked | locked | locked | locked | |||||
| ORLGR4H039 | locked | locked | locked | locked | |||||
| Example Input Window for connected entry with multiple Properties: 'apply same markup policy to entire list' unchecked |
|||||||||
| System Code | Total | Markup | Value | HoS Total | On SAVE/POST this would create 4 records in {pm_expense_ledger} AND {pm_el_connector} |
||||
| ORLGR3H007 | 200.00 | Percentage | 20.00 | 40.00 | |||||
| ORLGR3H019 | 200.00 | Percentage | 22.00 | 44.00 | |||||
| ORLGR4H001 | 200.00 | Percentage | 26.00 | 50.00 | |||||
| ORLGR4H039 | 200.00 | Percentage | 32.00 | 64.00 | |||||
| Example Input Window for standalone entry with multiple Properties: 'apply same markup policy to entire list' unchecked |
|||||||||
| System Code | Total | Markup | Value | HoS Total | On SAVE/POST this would create 5 records in {pm_expense_ledger} AND {pm_el_connector} |
||||
| ORLGR3H007 | NULL | NULL | NULL | 32.67 | |||||
| ORLGR3H019 | NULL | NULL | NULL | 32.67 | |||||
| ORLGR4H001 | NULL | NULL | NULL | 47.25 | |||||
| ORLGR4H020 | NULL | NULL | NULL | 13.19 | |||||
| ORLGR4H039 | NULL | NULL | NULL | 13.19 | |||||
| Example Input Window for connected entry with multiple Properties: 'apply same markup policy to entire list' checked |
|||||||||
| System Code | Total | Markup | Value | HoS Total | On SAVE/POST this would create 2 records in {pm_expense_ledger} AND {pm_el_connector} |
||||
| ORLGR3H007 | 20 | Set Value | 17.50 | 17.50 | |||||
| ORLGR3H019 | locked | locked | locked | locked | |||||
| Example HoS display - Expense Section | |||||||||
| Key | HoS Date | Description | Amount | ||||||
| ME | 07-Feb-2013 | call out fee (26Dec2012) | 35.00 | ||||||
| ME | 07-Feb-2013 | annual smoke detector battery change | 21.00 | ||||||
| PE | 07-Feb-2013 | replace pool blanket straps | 35.00 | ||||||
| PMM 130207-12 |
Accounting > Accounts > Expense Ledger | |
When creating records in Expense Ledger, on SAVE/POST ACRES to prompt user to update PMM. |
||
| Change to Expense Ledger - Add Record | ||
| On the INPUT WINDOW insert a label 'PMM' under
create date and above POST. On the right insert a checkbox with the text 'update PMM'. When checkbox is selected on POST save the Expense Ledger record and display the PM Expense Ledger Window. On PM Expense Ledger SAVE/POST go back to Expense Ledger display and shoe new record at top of list (same as current function). |
||
| Insert a new column on the Expense Ledger records display window between 'ID@ and 'contact' called 'PMM' When the Expense Ledger records are displayed: IF {expense_ledger_id} exists in {pm_el_connector} THEN display a TICK in the PMM column. Blank if no matches. On record VIEW, display ALL matching {pm_expense_ledger_id} next to PMM label. On record EDIT, display ALL matching {pm_expense_ledger_id} next to PMM label. Multiple record editing from original may not be possible. Individual records in {pm_el_ledger} may have to be edited separately. DELETE not available if payments made for record. DELETE not available if matching records applied to HoS with HoS Date prior to PMM Lock Date. DELETE only availble if no payments made for record AND HoS Date in {pm_expense_ledger} greater than PMM Lock Date {expense_ledger} will be deleted AND ALL{pm_expense_ledger} records connected by {pm_el_connector} |
||
| PMM 130210-00 void |
[menu] Property Management > PM Sale (11Feb2013 void, will use {sale_type}) | |
| Create a new menu item 'PM Sale' | ||
| Place [PM Sale] under [PM Expense Ledger] | ||
| PMM 130210-01 |
{table} sale_type | |||||
change |
||||||
| Sort Order | ||||||
| cannot be NULL Set to '0' on post if no value inserted. User can edit later. Sort Order may be used to determin display order in PMM. |
||||||
| Status | ||||||
| checkbox used/unused. The default value is false (unchecked) so the record will appear for selection in the PMM. When changed by DB MANAGER to TRUE the record will no longer be available for selection in the PMM. |
||||||
| No GUI for this table. DB MANAGER to set table as: | ||||||
| sale_type_id | name | sort_order | status | |||
| 1 | Sale | 20 | NULL | |||
| 2 | PM Sale | 10 | NULL | |||
| 3 | Change/Amend | 30 | NULL | |||
| 4 | Block/Stopsale | 50 | NULL | |||
| 5 | Cancel | 40 | NULL | |||
| complete 12Feb13 |
RH already updated table and change all {book_transaction_type_id} from '2' to '5'. System code needs to be updated to use '5' where'2' is currently set. |
|||||
| PMM 130210-03 |
{table} calendar | |
Currently there are check-in, checkout dates and times in |
||
| {calendar} | ||
| calendar_id | ||
| unchanged | ||
| property_id | ||
| unchanged | ||
| unit_id | ||
| can be NULL for future use will be rooms in a property such as rooms in a hotel |
||
| begin_date | ||
| unchanged | ||
| end_date | ||
| unchanged | ||
| end_date_original | ||
| unchanged | ||
| available_tomorrow | ||
| unchanged | ||
| {sale_transaction_id} (formerly {book_transaction_id}) | ||
| will become redundant as {calendar_id} will be the key link in {sale_transaction} | ||
| {parent_calendar_id} | ||
| NULL for new record previous {calendar_id} after <edit> <delete> |
||
| {child_calendar_id} | ||
| NULL for new record prior {calendar_id} after <edit> <delete> |
||
| provisional | ||
| unchanged | ||
| status | ||
| unchanged | ||
| {account_id} | ||
| will become redundant as only one calendar will exist per property. {property_id} is the key link [Calendar Update] to use {account_id} from {sale_transaction} Retain values for historic records. NULL for new records. |
||
| {user_id} | ||
| from {user_id} from {sale_transaction}{account_id} will also track {user_id} on <edit><delete> as amended records may be by a different user. |
||
| {contact_id} | ||
| from {contact} will be used to determin permission to amend record. Currently a PMC {account} will not be able to see records created by HO {account} but will see the dates booked on a calendar. This may be reviewed so the PMC could see records created by HO {account} where HO exists in Managed Property. |
||
| {created} | ||
| date/time | ||
| PMM 130210-04 |
GUI: Header > Message Box | ||
Insert a message box 300px wide and same height as header on the right hand side of the header. |
|||
| Example Message Box: | |||
| Message Box | <clear> | ||
| ACRES message box for user reference |
|||
| PMM 130210-05 |
Sales > Calendar Updater | ||||||
[Calendar Update] GUI currently displays date/time fields from {sale_transaction} (formerly {book_transaction}) |
|||||||
| With now just one area for calendars any <edit><delete> will immediately be reflected on GUI and websites. Dependant on User Profile: IF {calendar_id} does NOT exist in {sale_transaction} THEN <edit><delete> permitted (as record only generate by [Calendar Update]) ELSE IF IF {calendar_id} does exist in {sale_transaction} THEN <delete> NOT permitted <X> symbol to be feint and mouseover text 'record can only be deleted from Sale ID: {sale_id}' |
|||||||
| (this is the user {sale_id} unique to user account) At bottom of mouseover text box show text 'control & plus to add text to Message Box (ctrl +)' |
|||||||
| IF {calendar_id} exists in {sale_transaction} THEN <edit> permitted |
|||||||
| on SAVE/POST warn user that 'change will affect {sale_id}' <OK> / <Cancel> At bottom of mouseover text box show text 'control & plus to add text to Message Box (ctrl +)' On <OK> update {sale_transaction} with new {calendar_id} Automatically go to [Make Sale] and run <Apply Filter> with {sale_id} for user to view/edit/print as required. |
|||||||
| PMC will be permitted to amend {calendar} WHEN Account holder {property_id} exisits in {managed_property} for PMC. This means that a HO with a PMC could create a {calendar} record. The PMC would be able to amend the {calendar} record as {contact_id} for {property_id} exists in {manaed_property}. |
|||||||
| When the automated communications are built in, ACRES will prompt user to send email/SMS of update to {contact_id}. | |||||||
| Example Calendar Update display: | |||||||
| <V> | <E> | <X> | <+> | view, edit, delete, expand | |||
| sale trx id | {sale_transaction} | ||||||
| property id | {calendar} | ||||||
| Check-In Date/Time | {calendar} | ||||||
| Checkout Date/Time | {calendar} | ||||||
| created | |||||||
| sale trx type id | {sale_transaction} | ||||||
| parent cal id | {calendar} | only on <+> | |||||
| child cal id | {calendar} | only if {parent_calendar_id} in NULL otherwise on <+> |
|||||
| Username | {user_id} | Display name | |||||
| Account | {account_id} | Display name | |||||
| tba | Further specification of this section required depending on whether {pm_sale} is designed as a standalone table or incorporated into {sale}{sale_transaction}{sale_product}. | ||||||
| PMM 130210-06 |
{table} account_connector | |
Table used to track field values unique to {account_id} |
||
| {account_connector} | ||
| {account_connector_id} | ||
| unique auto increment | ||
| account_id | ||
| from{account} | ||
| account_sale_number_last | ||
| cannot be null integer initial value zero on create unless set by User can only be amended by DB Manager directly in DB table. |
||
| PMM 130210-07 |
{table} System > Base Data > Manage Accounts: Sale Number | |
This option will only be available on <Add record> |
||
| Insert a new label above <post> with text 'set account sale number' Insert a new input field {account_sale_number_last} Display text under input field 'leave blank if not required' |
||
| can be NULL integer only cannot be negative |
||
| On <post> | ||
| if NULL do not create record in {account_connector} if not NULL create record in {account_connector} with input value. |
||
| If new account wanted to start with Sale Number 1001 then input would be 1000. Not required for {Calendar Updater] so would be left blank. |
||
| PMM 130210-08 |
{table} sale | |
{sale} to be amended to accommodate multiple {sale_type}. |
||
| {sale} | ||
| account_sale_number | ||
| insert after {sale_id} calclulated by ACRES on creation of new record value = {account_connector.account_sale_number_last} + 1 set {account_connector.account_sale_number_last} to 'value' on ACRES update exisiting field values to be set = {sale_id} set {account_connector}{account_sale_number_last} to highest value {sale_id} |
||
| {sale_type_id} | ||
| insert after {account_sale_number} from {sale_type} on ACRES update all exisiting field values to be set where {sale_type}{name}='Sale' ({sale_type_id}='1') |
||
| {ttd_ref_manual} | ||
| change to {sale_manual_ref} make sure change is reflected ACRES wide. |
||
| {user_id} | ||
| insert after {account_id} from {user} will supercede {creator} GUI and documentation to show {name} from {user} set {user_id} for all records where IF {user}{name} = {sale}{creator} THEN set {user_id} ELSE IF {creator} in NULL THEN set {user_id} = '1' There should be no latent records. |
||
| 130211-01 | <function> Sales > Sale | |||||||
[Sale] GUI currently displays date/time fields from {sale_transaction} (formerly {book_transaction}) Display Check-In Date/Time from {calendar} Display Checkout Date/Time form {calendar} Display System Code from {property} using {propery_id} connection in {calendar}. GUI and documentation for all new records to display from {calendar} |
||||||||
| In connection with the {sale} structure change in 130210-08 the label in custom filter needs to change from ttd_ref_manual to manual_ref |
||||||||
| 130211-02 | Accounting > Audit > Sales |
| Apply rule from 130211-01 Exisitng report valid for {sale_type_id} = '1' ONLY Insert column far right 'Type' and display {sale_type_id} for visual check. For PM Reporting a new style for {sale_type_id} = '2' is required to show breakdown of all tax types. Will also need ability to report by HoS date as set by PMC. This could be sale date, check-in date, checkout date, balance received date. Report for {sale_type_id} = '2' will be specified after changes to table structures. |
| 130211-03 | Accounting > Bank Transaction > Reports > Sales > Margins |
| Exisitng report valid for {sale_type_id} = '1' ONLY Not required for {sale_type_id} = '2' |
| PMM 130212-00 |
System > Base Data > Manage Users |
| Move User Group label and checkboxes to right hand side of User Name ID input box. If {user_group_id} = '7' (Homeowner) then display at bottom of list. Use radio control rather than checkbox as cannot be combined with any other selection. When selected, any checkbox selected will be cleared. By default 'account' drop down box disabled until one or more User Groups selected. The following process is dependant of User staus. This will be the policy for a PMC creating their own {account_id} entries and profiles for their Homeowners. When User Group checkbox selected, only {account_id} created by PMC {account_id} available for selection. When {user_group_id} = '7' For {user_group_id} '7' {account_id} = PMC {account_id} will be fixed. A display of Properties from {pm_managed} to be displayed in the lower section of the GUI. Only Properties with {pm_managed}{to_date} = NULL to be displayed. Only Properties with {pm_managed}{user_id} = NULL to be displayed. Each Property available for selection to display: <checkbox> {system_code} and first line of address Multiple homes can be selected but an individual HoS per property will be produced on reporting. |
|
| Where a Property has changed ownership, the exisiting {pm_managed} would need to have a {to_date} inserted and a new {pm_managed} record created. The new record would then be available for seelction in this module. |
|
| Existing system remains unchanged for Calendar Updater. | |
| Homeowners that have been allocated a {user_id} will not have aceess to Calendar Updater. Homeowner will have to create a {Sale] that will update calendar. Homeowner ACRES profile to be defined separately. |
| 130801-00 | <function> System > Base Data > Manage Accounts - add record | ACRES only |
| ACRES LEVEL ACCESS only. | ||
| A new record can ONLY be created in {ACRES}. [Manage Accounts] should not be available to ANY {database} other than {ACRES} When a new record is created ACRES must AUTOMATICALLY create a TOP LEVEL Managed User account for {database} using {database} as default names: User Name ID: {database} Password: {database} Memorable Word: {database} account: {database} User Group: Super Admin but ONLY within {database}, NOT ACRES wide. Super Admin can then login and edit access codes. Super Admin can Defaults can then [Manage Users] for {databse}. |
||
| 130801-01 | {table} managed_user | |
| The {managed_user} table will be a connector table to control and track Manage Users. | ||
| Create {managed_user} | ||
| manage_users_id | ||
| primary key - unique id per record | ||
| user_id | ||
| from {user_id} | ||
| managed_user_from_date | ||
| date / time = 00:00:00 | ||
| managed_user_to_date | ||
| date / time = 00:00:00 | ||
| managed_user_updated_date | ||
| set to create date when record created set to system date when record edited |
||
| managed_user_updater_id | ||
| user_id from ACRES loggin session | ||
| managed_user_deleted | ||
| 0 or 1 | ||
| 130801-02 | [menu] System > Base Data > Manage User (update 01Aug2013) | |
| This section will facilitate ACRES billing on a PER USER / PER ACTIVE USER basis. This code will allow for period users whether seasonal workforce or breaks in periods of employment. Create a label in the Managed User GUI |
||
| Managed User Dates | ||
| Insert the [+] icon on the right of the label | ||
| When the [+] icon is selected a new record row will be available: managed_user_from_date field will be available for input |
||
| usual ACRES date format Can be less tahn current date Can be edited subject to access level Cannot be NULL - exisiting records will have to be edited manually or pre populated with 01/01/2000 LOCKED once current date is greater than managed_user_from_date |
||
| managed_user_to_date field will be available for input | ||
| usual ACRES date format can be NULL must be greater than managed_user_from_date |
||
| [X] icon only available on records where managed_user_from_date is less than current date | ||
| [X] option not available where managed_user_from_date is less than current date in this case a managed_user_to_date will need to be inserted |
||
| ON POST | ||
| if managed_user_from_date is NULL warn user to insert date or cancel on cancel record will not be updated/created |
||
| if managed_user_to_date is less than managed_user_from_date warn user to edit date/s or cancel on cancel record will not be updated/created |
||
| ON USE | ||
| where user_id is valid AND managed_user_to_date is less than current date (current date must be server not local to avoid override) Display message box 'ACRES access has expired. Contact your ACRES administrator [OK] |
||
| where user_id is valid AND managed_user_from_date is greater than current date (current date must be server not local to avoid override) Display message box 'ACRES access commences 'date'. Wait or contact your ACRES administrator [OK] |
||
| 130211- | Sales > Sale: Add record - unfinished | ||
Step A GUI change: |
|||
| Move <click to open date selector> next to Sale Date label. | |||
| Under Sale Date input box insert label 'Sale Type'. | |||
| Under label 'Sale Type' insert a drop down box. Use {sale_type} to control. | |||
| Will save {sale_type_id} in {sale} | |||
| For HO input field will be locked and set to {sale_type_id} '2'. | |||
| Move TTD Ref Manual label and input box down to under Sale Type dropdown box | |||
| Relabel 'Sale Manual Ref' | |||
| Move Client Ref label and input box below Sale ref manual input box. | |||
| Move <Add new contact> to current Client Ref label place. | |||
| Move <Contact Search> to current Client Ref input box place. | |||
| Move Contact Search input boxes in line and under current Client Ref input box. | |||
| Move Contact Search box labels in line and under current TTD Ref Manual input box. | |||
| Move <search> so left aligns with Contact Search input boxes. | |||
| Change also reflects required TAB order. | |||
| Search results can still be displayed in lower section. | |||
| The exisitng [Sale] process is unchanged where {sale_type_name}='Sale' but code with {sale_type_id} rather than name. | |||
| This covers a buy in where PMC is buying property in from another source other than {managed_property}. If Product attached where {property_id} exists in {managed_property} then {sale_type_id} automatically to be changed to 'PM Sale'. |
|||
| for PM Sale type this means it is the HO booking. Restrict access only with not all inputs available. | |||
| Step A: | do not display Contact Search options. allow search but only show {contact} where HO has booked {contact} previously. |
||
| Step B: | skip | ||
| Step C: | allow search but only show {customer} where HO has booked {customer} previously. | ||
| PM Sale by PMC sale and product type PM Sale PMC collecting funds product will appear on HoS |
|||
| PM Sale by HO PMC not collecting funds product will appear on HoS |
|||
| where PMC is requested to collect funds for entire booking, treat as PMC sale product to appear on HoS |
|||
| where PMC only collecting for partial booking such as bbq or pool heat then sales will be separated where funds collectable by PMC will appear in Sale. Reporting on {sale_type_1} will appear on PMC reports. PMC Sale to be linked to Pm Sale by {sale_id} |
|||
| PMM 1302 |
{table} pm_sale_connector - unfinished | ||
Look to incorporate into {sale}{sale_product}{sale_transaction} |
|||
| {pm_sale} | |||
| pm_sale_id | |||
| Sale | Sale options | ||
| Sale = PM Sale | |||
| Sale side open. Sales Purchase side LOCKED and flagged PM Sale. Field values to be tied to same value as Sale side as these values to be used for PM reporting and tax declarations. NOT included on Sale reporting. INCLUDED on PM reporting. Build report for tax declarations (Total tax LESS PM Sales tax) eg: When HO makes a booking, even though zero value. When HO makes a sale and revenue to be collected by PMC. |
|||
| Sale = Sale; Slaes Puchase = PM Sale (subject to User Profile settings) | |||
| Sale side open Sales Purchase side open INCLUDED on Sale reporting INCLUDED on PM reporting eg: Selling for a different rate than being paid to HO. Where PMC taking a fee for processing a booking it could be shown this way or use Sale=Pm Sale/Sales Purchase=Pm Sale and charge a booking fee or commission on HoS. Build report for tax declarations (Total tax LESS Sales Purchase tax) |
|||
| Sale = Sale; Sales Purchase = Sale | |||
| Sale side open Sales Purchase side open INCLUDED on Sale reporting NOT included on PM reporting eg: Buy in. Build report for tax declarations (Total tax LESS Sales Purchase tax) |
|||
| tab16 to tab37 |
<function> Accounting > Audit > Bank Accounts - report by period |
| The function of this routine is to be able to run various reports by Bank ID for reconciliation and audit. The report will be a culmination of;- Deposit Sale Receipts Transfers Purchase Ledger payments Sales Purchases payments The first start and end date selection will be for the bank transaction period. The second start and end date selection will be for the clear date period. This will enable reports on transactions in one reporting period that cleared post reporting period such as checks that cleared post year end. In this example the reporting period is 01 Jan 2009 to 31 Dec 2009 and the clear date period is blank. The object of the report is to show all transactions in 2009 for Bank ID 01. 1) Offer a drop down for Bank ID selection (use bank account names). 2) First Date Range Selection (transaction period) Transaction Start Date: 01 Jan 2009 (greater than or equal to this date) Transaction End Date: 31 Dec 2009 (less than or equal to this date) 3) Second Date Range Selection (cleared period) Cleared Start Date: leave blank Cleared End Date: leave blank 4) Offer a drop down for Reporting Code. Can be left blank. 5) show opening/closing balances checkbox. Report Order by Transaction Date then Transaction Reference then Transaction ID: Date | Description | Type | Ref | Debit | Credit | Cleared | Rp | BID | Notes Date = Transaction Date Description = if a deposit sale receipt. Description = to/from Bank Account Name if a transfer. Description = Contact Name if a purchase ledger or sales purchase payment. Description = Sales Receipt Type ID if a sales receipt. Type = abbreviated bank transaction type id from acres. Type = dd if a direct debit. Type = chk if a check issued. Type = crd if a credit direct such as credit cards and wire transfers. Type = cr if a credit such as a check received. Type = tsf for transfers. Ref = transaction number for direct debits, checks issued, deposit sale receipts. Ref = blank for transfers. Debit = the debit amount for any payments from the account and transfers out. Credit = the credit amount for receipts to the account and transfers in. Cleared = Cleared Date Rp = Reporting Code BID = Bank Transaction ID, Transfer ID or Payment ID. Notes = Expense ID if an Expense Ledger Payment (Payment Ledger). As space is limited when there are too many ID's to display just show Expense ID=n where n is the number of Expense ID's that were paid. Notes = transfer if a transfer. Notes = Sale ID's if Sale Purchase payment. As space is limited when there are too many ID's to display just show Sale ID=n where n is the number of Sale ID's. Notes = Sale ID's if a Sale Receipt. As space is limited when there are too many ID's to display just show Sale ID=n where n is the number of Sale ID's. At the end of the report show summary totals for all the Reporting Codes listed in the reporting period. If the 'show opening/closing balances checkbox' was checked then the report needs to start with an opening balance and finish with a closing balance. The opening balance will need to be calculated by acres. In Accounts > Bank Accounts where the name of the accounts are set there needs to be an added function where the Account Balance and Account Balance Date can be set. The Account Balance will be the true balance at close of business on the Account Balance Date and be used for account balance calcualtions prior and post the Account Balance Date. The first line of the report will show as:- Date = blank | b/f from 'b/f date' where b/f date is one day prior to Transaction Start Date | Type = 'bal' | Ref = blank | Amount = calculated opening balance | Cleared = blank | Rp = Blank | BID = Blank | Notes = opening balance The last line of the report will show as:- Date = blank | c/f from 'c/f date' where c/f date is one day after the Transaction Endt Date | Type = 'bal' | Ref = blank | Amount = calculated closing balance | Cleared = blank | Rp = Blank | BID = Blank | Notes = closing balance By using the Cleared Start Date and Cleared End Date reports can be run to calculate transactions that were made in one period but cleared in another period such as transactions that cleared post year end. The same report function will be used to cover tab16 to tab 37. |
| tab40 tab41 tba42 |
<function> Accounting > Bank Transactions > Reports > Expense Reports by Date, Category, Creditor |
For the existing reports Expenses by Date, Category and Creditor add an extra column on the report inbetween Date Paid and Ref Paid. |
| tab43 tab44 |
<function> Accounting > Bank Transactions > Reports > Expense Reports Outstanding by Date |
For the existing reports Expenses by Date, Category and Creditor add another Date selector on the right of Report Start Date: |
| 121128-03 | <function> Operations > Setup > Client Rate Code - client connector |
| Create Client_Rate_Code_Connector table Fields will be: Client_Rate_Code_Connector_ID Client_Rate_Code_ID Contact_ID (amended 03Dec2012) Client_Rate_Code_Connector_Date_From (default = today) or Date_Start Client_Rate_Code_Connector_Date_To (default = null) or Date_End Client_Rate_Code_Connector_Date_Created (system date not editable) Account_ID (added 30Nov2012) On the GUI add a column headed 'used' between client_rate_code_id and client_rate_code_name. May use a link icon if there is a suitable one. 'used' is not a stored field value. It will be calculated on the fly. When a user selects this menu item ACRES will calculate the value from the Client_Rate_Code_Connector table. The value will be the count of how many record rows include the Client_Rate_Code_ID. Display as [value] |
| 121128-04 | <function> Operations > Setup > Client Rate Code - inactive |
| Amend Client_Rate_Code table Add a new field 'Inactive'. Client_Rate_Code_Inactive (default value = false) All exisiting table entries to be set at false. Add a new 'inactive' checkbox under 'Whole words only' with the text 'show inactive records'. The default values will be unchecked so only active records are displayed when a filter is applied. |
|
 |
| 121128-05 | <function> Operations > Setup > Client Rate Code - view |
| Selecting the 'view' icon will display the Client Rate Code information. Under the sort-order label add a new label 'status' which is a user friendly name for the Client_Rate_Code_ID inactive field. Next to the new label display the field value: false = 'active true = 'inactive' The Add/Edit/Delete options should be removed as this functionality will be controlled by User Level Security (USL). |
|
 |
|
| Below the Client Rate Code information will be the display of any Clients that have been connected to the Client_Rate_Code_ID. Display columns will be: View Icon (may not be necessary) Edit Icon (for the Client_ID connection, not the Client_Rate_Code record). See 121128-07 Client_Rate_Code_Connector_ID Client Name (from Contact_ID) (amended 03Dec2012) Date_From Date_To Status (inactive value) Date_Created The edit function will depend on User Security Level (USL). |
| 121128-06 | <function> Operations > Setup > Client Rate Code - add/edit |
In both Add Record and Edit modes the new Client Connector function will be available. |
|
 |
|
| Add a new label box under sort order labelled 'Client Connector'. Under the input box for sort-order show the '+' icon. Next to the '+' icon add an input box for the Client name. The control functionality is to be the same as the text sensitive search box used when connecting a Property to a Client. As the Client name is input the results will show for selection. |
|
 |
|
| Once a Client name is selected, the user will click on the '+' icon to add a connection the Client_Rate_Code_ID. ACRES must validate if the Client_Rate_Code_ID and Client_ID already exists in the connection table. If the combination already exists the User should be advised with a Popup Warning Message (PWM) advising that the connections already exists. If the combination is unique then the following fields should be offered for input below the Client input field and to the right of the POST button: Date_From (default = today) put calendar date selector underneath Date_To (default = null) put calendar date selector underneath Select POST to create the connection. ACRES should again validate that the connection combination does not already exist for the ACRES Account as another User may have created the combination. If the combination does exist then display a PWM. When a POST is successful display the connectionms as defined in 121128-05. |
| 121128-07 | Sales > Make Sale - Client Rate Codes at product level |
| (original version: 091123-01) Moved the 'Board' display to between the Property Name and Start Date displays of the Product. Display the abbreviated board code under the Board display. Accommodation Only = AO. Expand vertical blue divider line up to the Product display information. Move the Purchase Supplier selection to the right of the divider line. Move the Purchase Contact below the Purchase Supplier. Move the Purchase Ref below the Purchase Contact. On the left of the divider line level with Purchase Supplier Name display the Client Name. This is not a selction box, just a display. Display the Client Employee (if exists) under the Client Name on the same level as the Purchase Contact Name. This is not a selection box, just a display. Display the Client Reference (if exists) below the Client Employee on the same level as the Purchase Ref. Keep the Sale Product Amot and Purchase Amt on the same level. Display the Sale Purchase Tax and Sale Purchase Total on the right of the diving line on the same level as the Sale Product Tax and Sale Product Total Rename Sale Profit to 'Product Margin' and display on the right side of the divider under Sale Purchase Tax. |
|
 |
|
| Under Sale Product Tax display the label
'Client Rate Code'. Under the Client Rate Code label show the '+' icon. Next to the '+' icon add an input box for the Rate Code Name. This will be a drop down selection. ONLY Rate Code Names for the Client_ID from the Rate_Code_Connector table will be displayed for selection. As only ONE Rate Code is permitted per PRODUCT the '+' function should be disabled if a Rate Code already exists for a Product. For example during an edit process where one was already defined at the time of the booking. Where a Client Rate Code already exists for a Product, display ONLY the 'delete' icon to the left of the Rate Code Name The Client Rate Code Name will print on the Booking Advice. This will be dealt with separately after Client Request Codes have been specified. |
| 121128-08 | <function> Operations > Setup > Client Request Code |
| Change the name from 'Operator Request Code' to 'Client Request Code'. Change database table and field names to reflect the change. |
|
 |
| 121128-09 | <function> Operations > Setup > Client Request Code - inactive |
| We cannot delete Client Request Codes as older bookings may refer to the codes so deleting a code may create a latent record. Amend Client_Request_Code table Add a new fields: Client_Request_Code_Date_From (default = today) or Date_Start Client_Request_Code_Date_To (default = null) or Date_End Account_ID (added 30Nov2012) Client_Request_Code_Date_From Populate existing records with 'create date'. If no 'create date' use 23 Nov 2009. Add a new 'inactive' checkbox under 'Whole words only' with the text 'show inactive records'. The default values will be records with a null end date so only active records are displayed when a filter is applied. |
|
 |
| 121128-10 | <function> Sales > Make Sale - Client Request Codes at product level |
| (original version: 091123-02) Client requests are not so unique so they are not limted to which Client may use them. Change STEP - F label to 'Notes and Requests' The blue banners only need to go across half the page or just to the right of the text boxes as the right hand side of the screen will be used now for Client Request Codes. Move the Header Note dropdown box to inside the Header banner. Move the Header Note Insert button to inside the blue header banner on the right side of the drop down box. Change the left arrow Header insert button to a down arrow insert button. Move the Product information from inside the Product banner to a new row between the Product Banner and the Product Text Box. Move the Product Note dropdown box to inside the Product banner. Move the Product Note Insert button to inside the Product banner on the right side of the drop down box. Change the left arrow Product insert button to a down arrow insert button. Move the Footer Note dropdown box to inside the Footer banner. Move the Footer Note Insert button to inside the Footer banner on the right side of the drop down box. Change the left arrow Footer insert button to a down arrow insert button. |
|
 |
|
| In the space now avaiable on the right hand side of the screen add a banner 'Client Requests' Under the banner show the '+' icon and next to the icon show a Client Request dropdown box. Users will select a Client Request from the dropdown box and select the '+' icon to add the request to the booking. Only active records will display. (NULL end date). ACRES will need to validate that a Client_Request_Code_ID has not already been selected for the booking. If the Client_Request_Code_ID already exists for the booking the User should be advised with a Popup Warning Message (PWM) advising that the 'Request Name' is already included. Selected requests will display below the Client Request dropdown box. 'delete' icon | Client Request Name Users will select the 'delete' icon to remove a request from a booking. Client Requests should will print on the Booking Advice above Footer Notes. Client Request Names should be srung together and separated by ': ' (semi-colon space). A text character length will need to be set so that Client Request Names print correctly on a Booking Advice making sure text doesn't overshoot borders and also to make sure a Client Request Name does not display on two separate lines. Example: Client Request Name 1; Client Request Name; Client Request Name 2 ; Client Request Name 3 ; Client Request Name 4; Client Request Name 5 |
| 100209-00 | <function> Operations > Contacts - employees | |
| Employee contacts should only be displayed in the results. The edit and delete option should be disabled.
The employer name should be displayed even though it may not match the search criteria. If a user selects the disabled option then acres should display a message window advising the user to edit the details from the contact_id for the employer. The contact type column should display 'Employee'. This resolves a problem of deleting what appears to be duplicated names in the contact db. |
||
 |
||
| 100210-00 | <function> Sales > Make Sale - removing product | |
| If a product is deleted from sale then any optional extras associated with that product should also be deleted. If there is another product of the same category type (ie. accommodation) then acres should ask the user if they wish to switch the optional extras assocaiated with the product being deleted to one of the other products on the sale. This will benefit users in situation where they are changing accommodation from one property id to another property id. instead of having to reload optional extras and pricing such as pool heat, discounts, they can just transfer them to another product. Acres should not let a product be deleted that has Sale Purchase payments made against it. Users will have to zero the values so the items shows as overpaid and accounts can claim the credit amount back from the Sale Purchase Contact ID. Where a product has a zero value on the sale side to the client, acres should have a checkbox that when selected, it will not display a line for the item on the booking advice to the client. |
||
| 100817-00 | <function> Deposit Sale Receipts: by Sale Receipt ID |
| Add the function to deposit sale receipts using the (+) function for sale receipt id's similar to the same function used for sale id's. |
| 101012-02 | <function> Contact | |
Add email address as a search field criteria from the drop down menu |
| 120224-00 | <function> Sales > Property Search/Book - default display |
| When Property Search/Book isselected the display shows all records from trx_is 1 including deleted rows. Add a check box under the exisitng '[ ] Whole words only' with the text '[ ] Shows deleted records'. Change the code so that the default display does not show deleted records. When the 'Show deleted records' box is selected and the 'Apply Filter' button is pressed then the blank records will display depending on the customer filter settings. |
|
 |
| 120224-01 | <function> Sales > Make Sale > Documentation - booking advice |
| Change the display order. Move 'Property ID' and result to display underneath 'Duration'. Move 'Type' 'Maximum' 'Board Basis' and results each down one row. |
|
 |
| 120224-02 | <function> Accounting > Bank Transactions > Deposit Sale Receipts - receipt search by Sale Receipt ID |
| Functionality required is to ADD (+) Sales Receipt ID's together for a single deposit in much the same way that Sale ID's can be added together. If two Clients each pay by check and each check covers multiple bookings and they are paid into the bank on ONE deposit banking slip then they will appear as a SINGLE credit on the bank statements. |
|
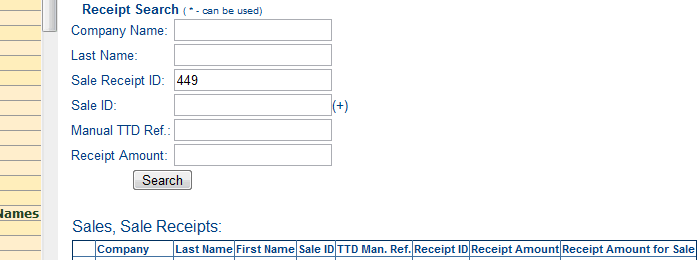 |
| 120224-03 | <function> Sales > Make Sale > Documentation - booking advice card receipt display |
When a Sale Receipt is by card, the follwed fields are offered for input. |
|
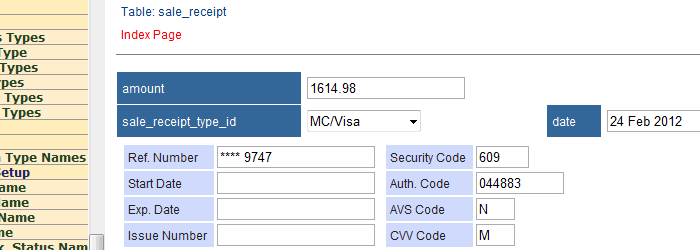 |
|
| If the Ref Number is completed fully numeric, abbreviated or with **** then only the last four INTEGERS should be displayed on the Booking Advice preceeded by '****'. Security Code, Start Date, Exp Date, Issue Number DO NOT get displayed. |
|
| Currently this example displays as above but the new style will as follows: Feb 24, 2012: US$1614.98 received on MC/Visa **** 9747 Auth Code: 044883 CVV: M AVS: N CR1080 @SR450 BID392 |
| 121002-00 | <function> Sales > Make Sale > Documentation - booking advice for product = hotel |
Where a product is included in a booking and the |
| 091216-00 | <function> Accounting > Bank Transactions > Payment Ledger - expense breakdown |
| Example payment_id 107 We can show the expense id's that have been paid similar to how we show payment receipt amounts and sale_id. This can replace the description column. Users wanting to see the description can always look up the id in expense ledger. |
|
 |
| 091216-01 | <function> Accounting > Expense Ledger - contact_id security |
| Once an expense ledger id has been paid, acres needs to lock the expense_id contact from being changed. For example, if the expense was for Progress Energy and was paid, you don't want any users to be able to change the contact from Progress Energy to say Brighthouse as this would not only affect the payment ledger but also creditor reporting. |
| 091222-00 | <function> Sales > Make Sale > Step: Show Sales Document |
| Example: Sale_ID 1713 When a product level optional extra is added to a sale, the breakdown needs to be displayed below the product display that the option extra has been added to. So Optional extra 1 would be below Product 1, Optional extra 2 would be below Product 2. All product and product level optional extras display above the pricing breakdown. |
| 091119-09 | [function] Accounting > Bank Transactions - Payments | |
20Jul2013 check if the functionality has been done even though not as specified. |
||
| When the user input some search criteria, all contacts that have expense ledger entires with outstanding amounts NOT EQUAL to zero will be displayed that match the search criteria. When the user selects the contact, all expense ledger entries with amounts NOT EQUAL to zero for that contact will be displayed. Columns will include the total value of the expense, any amounts alreay paid and the amount outstanding which may have a +ve or -ve value. Very much along the lines of Sales Receipts. User then inserts the amounts they are paying. acres will automatically calculate the amount being paid. When the user has completed the input fields and posts the payment, acres will ask the user to verify with a pop up like the property sales dates confirmation. If the user has not inserted a Transaction Number (unlikely in the event of a direct debit) then acres will automatically insert a value of year+month+day+number. So for November 19th, 2009 the value would be: 2009111901 If the value was already in use for any ONE particular direct debit + bank_id paring then acres will simply add '1' to the value until there is a unique direct debit reference. This gives 99 possible direct debit entries on any one day. The value must be unique to the transaction type and bank)id paring, not just the bank_id as a credit on the same day may also be given a reference 2009111901 but the transaction type would be cr or crd. Once the user verifies the payment, acres must show the debit transaction value in the bank_id. For expense ledger payments, the reporting code will be the id for 'expense ledger'. |
| 091119-08 | [function] Accounting > Bank Transactions - Transfers | |
| 20Jul2013 check if the functionality has been done even though not as specified. Selecting 'Bank Transactions' in the 'Accounting' menu will display the options: Receipts - Transfers - Payments Selecting 'Transfers' will generate the following screen: 1) Transfer date: [input date] 2) Transfer from: [select from bank_account_id] 3) Transfer to: [select from bank_account_id] 4) Transfer amount: [input amount] 5) Clear date: [input date] Notes 1) Standard acres date input. Can also offer calendar as per Make Sale for accommodation. Current date by default. 2/3) If users duplicated bank_account_id acres will notify user and not complete transfer process. 4) If users do not type in a decimal point then acres to add [.00] to the end of the input value. This will be verified to the user before posting. 5) Standard acres date input. Can also offer calendar as per Make Sale for accommodation. Null by default |
||
| When the user has completed the input fields and posts the transfer, acres must first verify that the bank_account_id's are unique. If they are, acres will ask the user to verify with a pop up like the property sales dates confirmation. Once the user verifies the transfer, acres must show the debit transaction for (2) and a credit transaction for (3). In both cases, the reporting code will be the id for transfer, the details will be 'transfer' and the notes will show the label for the bank account the money was tranfered to/from. The is (2) will show (3) and (3) will show (2). Once the entry is completed, only the entry just made should be displayed on screen, not all bank transactions across all bank accounts. |
| 091119-07 | [function] Accounting > Bank Transactions - Sale Receipts | |
| 20Jul2013 check if the functionality has been done even though not as specified. In it's current form, 'Bank Transactions' serves only the part for depositing Sales Receipts into a chosen bank account. This module needs to be expanded to handle these functions: Sale Receipts Bank Transfers (between users bank accounting defined in acres) Payments - both Expense Ledger and Sales Purchase We will handle Sale Receipts in this section and other items under their own references. |
||
| When 'Bank Transactions' is selected, the first screen displayed should offer the following: Receipts - Transfers - Payments This can either be a drop down or radio control. When 'Receipts' is selected the current Add Record functionality of 'Bank Transactions' can be performed. Once the entry is completed, only the entry just made should be displayed on screen, not all bank transactions across all bank accounts. |
| 130423-00 | <function> Quick Clicks to frequently used menu options | ||
| As the menu item expand a lot of time for users will be spent navigating to the require function. Visual icons will be created as shown in a new 'quick clicks' (QL) section of the header. Eventually, ACRES should automate the most frequently used funtions for any given user and show these in the QL display area. Prior instructions have been documented to extend the left menu to the top of the page display so the 'header' will just cover the 'body' section of the gui and not the whole page. The link icons will be 35px by 35px and display a total of 2 by 2 or 2 by 3. |
|||
| Example links. They have been done with a selection of background colors to stand out when displayed in ACRES. | |||
| Contacts: | |||
| Expense Ledger | |||
| Payment Ledger | |||
| Property | |||
| Sale | |||
| Sales Receipt | |||
| An example of a QL display 2 x 3 would be: | |||
| tab07 20Jan13 |
<function> Accounting > Audit > Sales - by period |
section completed. Below for future dev. RTD = Received To Date |
| PMM 130207-04 |
{table} Operations > Setup > PM HoS Key | ACRES only | ||||
| ACRES LEVEL ACCESS only for Add/Edit. ALL other {database} VIEW only. | ||||||
| still to be tested on live system remove add record function unless db = {ACRES} |
||||||
| By default INACTIVE records will not be displayed. If a user creates an entry where the {Key} is an exact match then the status can just be set to ACTIVE and a screen warning that '{key} already exists'. When user selects menu item no records will be displayed. Items available will be: <Custom Filter>, Checkbox with label 'Show inactive records', <Apply Filter> <reset filter> <Add record>. Where <Apply Filter> is selected without any filter criteria, records will be displayed ASCENDING by {Sort Order}. Edit Icon will be displayed. When selected, ACRES will warn user that changes will affect records in the PMM. OK to continue / Cancel. Users will NOT be allowed to delete records. They will need to change the Status. When creating a new record, on save the new record is to appear on the top of the list so records to be displayed DESCENDING by id. |
||||||
| PMM 130207-08 |
{table} markup | ACRES only |
| ACRES LEVEL ACCESS only for Add/Edit. ALL other {database} VIEW only. | ||
| 31Jul2013: Test section to make sure only add/edit at ACRES level. | ||
| Still need to verify logic for 'X' Exact Value calculations. | ||
| 130801-03 | {table} sale: sale_ref_manual | |
In order for ACRES users to insert their own sales references, if they wish, when first using the system there is already a field for sale_ref_manual in {sale}. |
||
| this will save having to copy all the exisiting values | ||
| Change all references ACRES wide from ttd_ref_manual to sale_ref_manual | ||
| Accounting > Audit > Sales: all report column headings | ||
| Accounting > Bank Transactions > Payments > Sales Purchase: add record - field label | ||
| Accounting > Bank Transactions > Reports > Sales > Margins: all report column headings | ||
| Sales > Make Sale: custom filter dropdown | ||
| Sales > Sales Receipt: add record gui label | ||
| Sales > Sales Receipt: gui column header label | ||
| 130917-00 | <function> Accounting > Audit > Sales Purchases Payments - payment by period | |
| tab13-15 additional specifcation post 15Sep2013 delivery. | ||
| For bank_id only include column in report and summary on bank_id that have values in reporting period. i.e. no need to display 'Directors Loan Account' as these are not used to pay Sales Purchases. |
||
| Under Payment Start Date: Payment End Date: INSERT O radio control with label 'summary by month' O radio control 'matching records only' |
||
| no control: | As current report excluding null value bank_id |
|
| summary by month: | No individual record display Monthly summary totals ONLY Reporting period totals Bank ID listing and totals at end of report with Payment Grand Total |
|
| matching records only: |
All Sales Purchases within Sales/Service range to be itemised where there has been a transaction included in the payment start/end date range. This includes where there has been a positive transaction on one bank_id and a negative transaction in another bank_id that may result in an overall zero value. The key is they are not null. Summary totals by month Reporting period totals Bank ID listing and totals at end of report with Payment Grand Total |
|
| When accounting is done on an accruals basis, the 'summary by month' will enable users to obatain a Sales Purchase creditor figure or Sales Purchase Pre-payment figure for a reporting period. Using 'matching records only' will enable users to obtain Sales Purchase payment analysis for specific records only rather than every record in a Sales Purchase start/end date range. When reporting on Sales Purchase transactions post year end only the records paid post year end will be included in the report rather than every record in the reporting period. This saves display multiple 'zero' transactions in the bank_id columns that do not match the Sales Purchase start/end date range. |
||
| 130918-00 | <function> Accounting > Audit > Sales Receipt - by period | |
| tab09-11 additional specifcation post Sep2013 delivery. | ||
| For receipt type only include column in report and summary on receipt type that have values in reporting period. i.e. no need to display a column in no values for the entire reporting period. |
||
| Under Receipt Start Date: Receipt End Date: INSERT O radio control with label 'summary by month' O radio control 'matching records only' |
||
| no control: | As current report excluding null value receipt_type_id |
|
| summary by month: | No individual record display Monthly summary totals ONLY Reporting period totals Receipt Type listing and totals at end of report with Receipt Grand Total |
|
| matching records only: |
All Sales Receipts within Sales/Service range to be itemised where there has been a transaction included in the receipt start/end date range. This includes where there has been a positive transaction on one receipt and a negative transaction in another receipt that may result in an overall zero value. The key is they are not null. Summary totals by month Reporting period totals Receipt Type listing and totals at end of report with Receipt Grand Total |
|
When accounting is done on an accruals basis, the 'summary by month' will enable users to obatain a Sales Receipt debtor figure or Sales Receipt deposit figure for a reporting period. |
||
| 140303-00 | {table} External Website Control | ||
| The {external_website_control} table will be used to dynamically control the property information and image display on any specified url/website. All colors stored as HEX colors. Create table {external_website_control} |
|||
| {external_website_control_id} | |||
| auto number / unique/ primary key | |||
| {external_website_control_name} | |||
| standard url character validation must be unique to within {account_id} |
|||
| {external_website_control_from_date} | |||
| cannot be NULL cannot be inside an exisitng date range for {external_website_control_name} cannot be > {external_website_control_to_date} within same record |
|||
| {external_website_control_to_date} | |||
| can be NULL cannot be < {external_website_control_from_date} within same record cannot be inside an exisitng date range for {external_website_control_name} cannot be NULL if NULL value already exists for {external_website_control_name} |
|||
| {external_website_control_table_wdith} | |||
| set to 570px lock field so cannot be edited by anyone |
|||
| {external_website_control_table_align} | |||
| set to center lock field so cannot be edited by anyone |
|||
| The table will be centered to the pages display. Not all text centered. | |||
| {external_website_control_table_cell_padding} | |||
| set to 2px lock field so cannot be edited by anyone |
|||
| {external_website_control_table_cell_spacing} | |||
| set to 0px lock field so cannot be edited by anyone |
|||
| {external_website_control_table_border} | |||
| set to 1px solid lock field so cannot be edited by anyone |
|||
| That is all borders rather than setting individual border-top, border-bottom, border-left, border-right. | |||
| {external_website_control_background_color} | |||
| default #FFFFFF | |||
| {external_website_control_base_color} | |||
| offer colour picker at some point default #013B8E will be used for border color, text color, reverse highlight color |
|||
| {external_website_control_secondary_color} | |||
| default #99CCFF | |||
| {external_website_control_font_family} | |||
| default Verdana, Helvetica, sans-serif | |||
| {external_website_control_font_highlight_color} | |||
| default #FFFFFF | |||
| {external_website_control_font_size} | |||
| default 11px accept only integer values between 8 and 20. |
|||
| {external_website_control_font_weight} | |||
| default normal normal and bold only |
|||
| 140303-01 | {table}External Website Control Connector | |
| The {external_website_control_connector} table will be used to connect {account_id} with {external_website_control} Create table {external_website_control_connector} |
||
| {external_website_control_connector_id} | ||
| auto number / unique/ primary key | ||
| {external_website_control_id} | ||
| from {external_website_control_id} | ||
| {account_id} | ||
| from {account_id} | ||
| 140304-00 | <function> Dynamic Property Display - text | |||||||
The function of this module is to provide dynamic property display on a URL based on stored data in ACRES. |
||||||||
| URL Control Window |
||||||||
| The |
||||||||
| URL Name From Date To Date |
||||||||
| ACRES to show a 'SAVE to continue' message | ||||||||
| Having the [SAVE to continue] function will enable ACRES to validate the URL name and dates before continuing to define the rest of the URL Control criteria.' | ||||||||
| The first 4 fields would be shown on the first row with the |
||||||||
| selecting |
||||||||
| 'URL Control record is incomplete' | ||||||||
| {external_website_control_id} {external_website_control_name} {external_website_control_from_date} {external_website_control_to_date} |
||||||||
| {external_website_control_background-color} | ||||||||
| accept default, input HEX color or offer color picker chart | ||||||||
| {external_website_control_table_wdith} | ||||||||
| 570 | ||||||||
| {external_website_control_table_align} | ||||||||
| center | ||||||||
| {external_website_control_table_cell_padding} | ||||||||
| 2 | ||||||||
| {external_website_control_table_cell_spacing} | ||||||||
| 0 | ||||||||
| {external_website_control_table_border} | ||||||||
| 1 | ||||||||
| {external_website_control_background-color} | ||||||||
| accept default, input HEX color or offer color picker chart | ||||||||
| {external_website_control_base_color} | ||||||||
| accept default, input HEX color or offer color picker chart | ||||||||
| {external_website_control_secondary_color} | ||||||||
| accept default, input HEX color or offer color picker chart | ||||||||
| {external_website_control_font_family} | ||||||||
| accept default or choose font family | ||||||||
| {external_website_control_font_highlight_color} | ||||||||
| accept default, input HEX color or offer color picker chart | ||||||||
| {external_website_control_font_size} | ||||||||
| accept default or input value | ||||||||
| {external_website_control_font_weight} | ||||||||
| select required font weight | ||||||||
| On [POST] the display would revert to hidden mode for the display parameters within show mode for the EWCW Example: URL Control Window |
||||||||
| ID | URL Name | From Date | To Date | |||||
| 1 | myholidayvillawebsite.com | 01-Jan-2013 | 31-Dec-2013 | |||||
| 2 | myotherholidayvillawebsite.com | 01-Jan-2013 | ||||||
| 3 | myholidayvillawebsite.com | 01-Jan-2014 | ||||||
| Property Description Display Set first table row background-color to {external_website_control_base-color} Set first table row text-color to {external_website_control_font_highlight_color} |
||||||||
| Display '{location_id.name}: {property.name}' | ||||||||
| font-weight: bold text-align: center |
||||||||
| Set second table row background-color to {external_website_control_secondary_color} Set second table row text-color to {external_website_control_base_color} |
||||||||
| Display 'Property ID: {system_code} - {property.bedrooms} Bedrooms, {property.bathrooms} Bathrooms, Sleeps {property.sleeps}' | ||||||||
| font-weight: bold text-align: center |
||||||||
| Third row is split in two columns. Third row first column |
||||||||
| set first cell to 15px wide will populate with bullet/icon image |
||||||||
| Third row second column | ||||||||
| display '{location_id.name}, {location_type_id.6}, {location_type_id.4}, {location_type_id.3}' | ||||||||
| Fourth row reserved for distances from airports/attractions | ||||||||
| Fifth row reserved for resort text | ||||||||
| Sixth row blank or spacer | ||||||||
| Seventh row for property description | ||||||||
| display (property.full_description) | ||||||||
| Eighth row onwards for property facilities. Split in 4 columns. The number of continuing row will depend on the number of property facilities. Property facilities will be displayed by {prop_facility.sort order}. Eighth row first column |
||||||||
| set first cell to 15px wide will populate with bullet/icon image |
||||||||
| Eighth row second column | ||||||||
| {prop_facility_name} first display will be the lowest {prop_facility.sort_order} where {property_id.prop_facility_id} exists in {prop_facility_connector} |
||||||||
| Eighth row third column | ||||||||
| set first cell to 15px wide will populate with bullet/icon image |
||||||||
| Eighth row fourth column | ||||||||
| {prop_facility_name} first display will be the lowest {prop_facility.sort_order} where {property_id.prop_facility_id} exists in {prop_facility_connector} |
||||||||
| Tables rows will continue to be dynamically populated for all {property_id.prop_facility_id} | ||||||||
| 140304-01 | {table} URL Control - extended for images | ||
Extension for {external_website_control} to control image display. |
|||
| {external_website_control_image_x2_table_wdith} | |||
| set to 570px lock field so cannot be edited by anyone |
|||
| {external_website_control_image_x2_table_align} | |||
| set to center lock field so cannot be edited by anyone |
|||
| The table will be centered to the pages display. Not all text centered. | |||
| {external_website_control_image_x2_table_background_color} | |||
| default #FFFFFF lock field so cannot be edited by anyone OR link to {external_website_control_background-color} |
|||
| {external_website_control_image_x2_table_border} | |||
| default none lock field so cannot be edited by anyone |
|||
| {external_website_control_image_x2_table_cellpadding} | |||
| default 0 lock field so cannot be edited by anyone |
|||
| {external_website_control_image_x2_table_cellspacing} | |||
| default 0 lock field so cannot be edited by anyone |
|||
| {external_website_control_image_x2_text_align} | |||
| default center lock field so cannot be edited by anyone |
|||
| {external_website_control_image_table_wdith} | |||
| set to 270px lock field so cannot be edited by anyone |
|||
| {external_website_control_image_table_padding} | |||
| default 5px lock field so cannot be edited by anyone |
|||
| {external_website_control_image_label_background_color} | |||
| default #013B8E OR link to {external_website_control_base_color} |
|||
| {external_website_control_image_label_padding} | |||
| default 3px lock field so cannot be edited by anyone |
|||
| 140304-02 | <function> Dynamic Property Display - images | |||
| The function of this module is to provide dynamic property display on a URL based on stored data in ACRES. Image path derived from ACRES: eg Pictures Path: us/fl/lake_county/clermont/high_grove/4h013/ Image control field to be added to bottom of text control fields: 140304-00 <function> Dynamic Property Display - text |
||||
| {external_website_control_image_x2_table_wdith} | ||||
| 570 | ||||
| {external_website_control_image_x2_table_align} | ||||
| center | ||||
| {external_website_control_image_x2_table_background_color} | ||||
| #FFFFFF | ||||
| {external_website_control_image_x2_table_border} | ||||
| none | ||||
| {external_website_control_image_x2_table_cellpadding} | ||||
| 0 | ||||
| {external_website_control_image_x2_table_cellspacing} | ||||
| 0 | ||||
| {external_website_control_image_x2_text_align} | ||||
| center | ||||
| {external_website_control_image_table_wdith} | ||||
| 270 | ||||
| {external_website_control_image_table_padding} | ||||
| 5 | ||||
| {external_website_control_image_label_background_color} | ||||
| accept default, link to {external_website_control_base_color}, input HEX color or offer color picker chart | ||||
| {external_website_control_image_label_padding} | ||||
| 3 | ||||
Property Image Display The first row is the Image Label. |
||||
| {external_website_control_image_x2_table_wdith} {external_website_control_image_x2_table_align} {external_website_control_image_x2_table_background_color} {external_website_control_image_x2_table_border} {external_website_control_image_x2_table_cellpadding} {external_website_control_image_x2_table_cellspacing} {external_website_control_image_x2_text_align} |
||||
| Set first Property Image Table located in left cell of Property Image Display Table | ||||
| {external_website_control_image_table_wdith} {external_website_control_image_table_padding} |
||||
| First Property Image Label | ||||
| {external_website_control_image_label_background_color} {external_website_control_image_label_padding} text = image label text from ACRES |
||||
| First Property Image | ||||
| image = image with lowest sort order in ACRES | ||||
| Set second Property Image Table located in right cell of Property Image Display Table | ||||
| {external_website_control_image_table_wdith} {external_website_control_image_table_padding} |
||||
| Second Property Image Label | ||||
| {external_website_control_image_label_background_color} {external_website_control_image_label_padding} text = image label text from ACRES |
||||
| Second Property Image | ||||
| image = image with second lowest sort order in ACRES | ||||
| Continue showing Property Image Display tables for all images with a spacer of around 5px between each table. They should be separate tables, not one big table. Thiswill speed uo the display of images on a webpage as each table will load and display rather than loading a large file before displaying to the end user. |
||||
| 140304-03 | <function> Properties - select Floor Plan | |||
| The function of this module is link a Property to one or more floor plans if they exist. The Property Image path derived from ACRES for specific High Grove properety is: eg Pictures Path: us/fl/lake_county/clermont/high_grove/4h013/ All Floor Plan Images exists at the route for the resort so the floor plan images for High Grove will be found at: Pictures Path: us/fl/lake_county/clermont/high_grove/ All Floor Plan images begin with 'fp' |
||||
| Under the current image display area 'F' in Properties, below the Property Images display all images for the resort location that begin with 'fp'. About each floor plan image display the text |
||||
| 'Use this floor plan image in URL Control' with a checkbox next to the text | ||||
| Each image checked will be used as there may be more than one floor plan. For example the first floor plan and the second floor plan. There will be no label defined as ACRES will just display a generic label for the resort. |
||||
| High Grove Floor Plan | ||||
| 140416-00 | <function> Documentation > Booking Advice - Internet Codes | |||
| For Booking Advice style 2 the Internet Name and Wi-Fi Password need to display on the Booking Advice. | ||||
| 140709-00 | <function> ACRES > Help & Hints bubble | ACRES only |
| For designated pages, sections and fields provide a 'Help & Hints Bubble' (HHB) (? inside bubble) that users can mouse over to display the contents and click on to open 'Help & Hints window' (HHW). For a quick view or user refresh the mouseover can be used to jog memory. When the mouse pointer moves away from the HHB the HHW will no longer be displayed. The click option to open a HHW will allow the user to drag the HHW to an area of their gui whilst working so as to provide a visual aid. The user will have to close the HHW by clicking on the HHB. Text inside the HHW can advise users to click on HHB to toggle HHW between visible and invisible. Ideally the HHB would be a layer on the gui. Click and hold down mouse button and move to required area. If there is a HHW for the area where the HHB is placed the HHB could change colour to GREEN to signal to user that a HHW is available. When not in use the HHB could be located in the header see in the Quick Links display area, see 130423-00 |
||
| 140610-00 11Sep2014 |
<function> Sales > Sale - Period Booking | |
| POST DELIVERY 11Sep2014 |
||
| The second part would be to allow the {contact_id} to create the sale_id within the Period Booking but this doesn't need to be delivered from the start. When a Period Booking is allocated to a {contact_id} an ACRES Account can be created for the {contact_id} to login in and maintain their sales within the Period Booking Date range per {property_id}. This would just be an extension of the calendar updater interface that homeowners use to update their own calendars. | ||
| 140416-00 09May2014 |
<function> Documentation > Booking Advice - Internet Access | |
Only to be printed for style 2 - Access Codes |
||
| IF WiFi Name IS NOT NULL AND WiFi Code IS NOT NULL AND WiFi From Date is VALID THEN print details after door access and alarm codes eg WiFi Name = MyWiFi; WiFi Code = MyWiFiCode; WiFi From Date = 01Aug2014 IF Product Checkout Date is LESS THAN WiFi From Date THEN WiFi details will not be displayed IF Product Checkout Date is GREATER THAN or EQUAL TO WiFi From Date THEN WiFi details will be displayed after door access and alarm codes Example printed line with WiFi details: Lock Box Code: 1234 / Alarm ON: 1234 OFF: 1234 / Internet Name: MyWiFi / WiFi Password: MyWiFiCode |
||
| POST DELIVERY 09May2014 | ||
| Print Internet Access details one line below Access Codes to avoid overprinting on right side detailsof Booking Advice | ||
| tab12 24Sep2013 |
<function> Accounting > Audit > Sales Purchases - by period | ||||||||||||
| Use the new Sales report as a guide. There will be some minor difference in the report layout. The option to run the report by Sale Date or Service Date will also apply. The Service Date and Sale Date will be flipped on the reports depending on which style is selected. Under the date range fields will be a checkbox and summary label. The default is unchecked. [ ] summary by month |
|||||||||||||
| unchecked: | All Sales Purchases within range to be itemised Summary totals by month Reporting period totals |
||||||||||||
| checked: | No individual record display Monthly summary totals ONLY Reporting period totals |
||||||||||||
In this example the reporting period is 01 Jan 2009 to 31 Dec 2009. The report will display all Sales Purchases for the reporting period. |
|||||||||||||
| Service Date | Man Ref | Sale ID | Check-in | Checkout | Supplier | Supplier Ref | Amount | Tax | Total | PTD | Due Out | Sale Date | |
| 01Feb2009 | 090201-01 | 3 | 01Feb2009 | 15Feb2009 | ACME TVL | 1234 | 500.00 | 0.00 | 500.00 | 500.00 | 0.00 | 15Dec2008 | |
| 02Feb2009 | 090202-01 | 7 | 02Feb2009 | 16Feb2009 | ACME TVL | 1235 | 1000.00 | 0.00 | 1000.00 | 1000.00 | 0.00 | 15Mar2008 | |
| ACME CARS | 1236 | 200.00 | 0.00 | 200.00 | 200.00 | 0.00 | |||||||
| ACME BBQ | 1237 | 50.00 | 0.00 | 50.00 | 50.00 | 0.00 | |||||||
| 25Dec2009 | 091225-01 | 8 | 25Dec2009 | 04Jan2010 | ACME TVL | 1238 | 700.00 | 0.00 | 700.00 | 700.00 | 0.00 | 03Jan2009 | |
| Reporting period totals: | 2450.00 | 0.00 | 2450.00 | 2450.00 | 0.00 | ||||||||
PTD = Paid To Date |
|||||||||||||
| POST DELIVERY 24Sep2013 | |||||||||||||
| Still need to check layout of report in default mode where more than one {contact_id} exists in a {sale_id}. | |||||||||||||
| spec | 080101-00 {richimport.LocLevelnn} Locations | 080101-00 | |||||
| Locations table structure: There will be multiple layers of locations, each having either a parent, child or both. Earth will be the root for locations but does not need to be definable. Continent will be reserved for the continental regions but does not need to be definable. Can hard code, Asia, Europe etc. Locations are used to define where a product is located. A hotel maybe located in Florida, but more specifically in the International Drive area of Orlando. By setting the LOCATION in Acres to a Zone, Acres would find the hotel whether you search on Florida, Orlando Area, Orlando or International Drive. Location structure will initially be defined at ACRES level and may be copied to PRIVATE level for Acres users who choose to maintain there own locations. |
|||||||
| LocationGeoCountry | |||||||
| Geographical area larger than a country but smaller than a continent. e.g. The Caribbean Look at using Location with Location table like County in USA is inside a State. Relationship should be than included Location cannot be larger than defined Location. The location name would need to be created then include locations stating what level the included location is. |
|||||||
| LocationCountry | |||||||
| Country - used for Countries. e.g. United States of America. | |||||||
| see LocLevel03 | |||||||
| LocationCounty/State/Province | |||||||
| County/State - Smaller than a Country, larger than a region district. e.g. Florida. see LocLevel04 |
|||||||
| LocationRegion | |||||||
| Region is smaller than a State/Province but larger than a District. e.g. Orlando Area includes Lake County, Orange County, Osceola County, Polk County | |||||||
| LocationDistrict | |||||||
| District - Smaller than a region, larger than a city. e.g. Orange County. see LocLevel05 |
|||||||
| LocationCity | |||||||
| City - Used for cities. Smaller than a district, larger than a zone. e.g. Orlando. see LocLevel07 |
|||||||
| LocationZone | |||||||
| Zone - used for an area within a City e.g. Harlem, Manhattan | |||||||
| LocationAirport | |||||||
| Used for Airports | |||||||
| LocLevel00: The World | |||||||
| LocLevel00 | |||||||
| World Continental Region Continent Country County/State/Province Region District City Zone Airport |
|||||||
| LocLevel01: Continental Region | |||||||
| LocLevel01 | |||||||
| Americas Oceania Australiasia Europe Africa Asia Antartica |
|||||||
| LocLevel02: Continent | |||||||
| LocLevel02 | |||||||
| Africa Australia Asia Europe North America South America |
|||||||
| LocLevel03: County | |||||||
| LocLevel04: County/Province/State | |||||||
| LocLevel05: | |||||||